Published: Feb 15, 2020 by K. E. Claytor
When Josie and I saw the Trellis - an illuminated button pad - we just knew we needed to invent a project so we could get one.
This project is pretty simple hardware-wise, but flexible enough that it can be programmed with plenty of neat functions. For example, you could label the buttons and turn it into a simple calculator. My audience is just learning addition and subtraction, so we made a couple of simple math games and a puzzle game.
Here’s the summary video:
This project also appears at:
This project cost $50 and is easy:
- Hardware: Easy
- Software: Easy
- Assembly: Easy
Hardware
The electronics parts list consist of:
- Trinket M0
- 16x 3mm LEDs
- 1x trellis
- 1x soft button pad for trellis
- 1x 14-segment LED display
- 2x momentary pushbuttons
- Half-sized perma-protoboard
- 2xAA battery holder
- 1x latching pushbutton (needed if battery holder doesn’t have a switch)
- Female headers (optional)
The non-electronics parts consist of:
- Cardboard box
Wiring
I’ll introduce the full circuit diagram and then break it down.
The wiring schematic is quite busy, but very straightforward.
- connect everything to grouknd.
- the Trellis and 14-segment display need I2C SDA and SCL
- mode and select go to D3 and D4
- power comes in through the power switch to Vbatt.
One issue that I ran into was the power for the Trellis. When running off of USB, use USB power (V_usb) but when running off of batteries, the 3.4 V 2xAA cannot supply the V_usb pin correctly, so instead use the V_batt pin.
Here’s the schematic:
And the circuit diagram:
As always, prototype on a protoboard before transferring to the perma-proto.
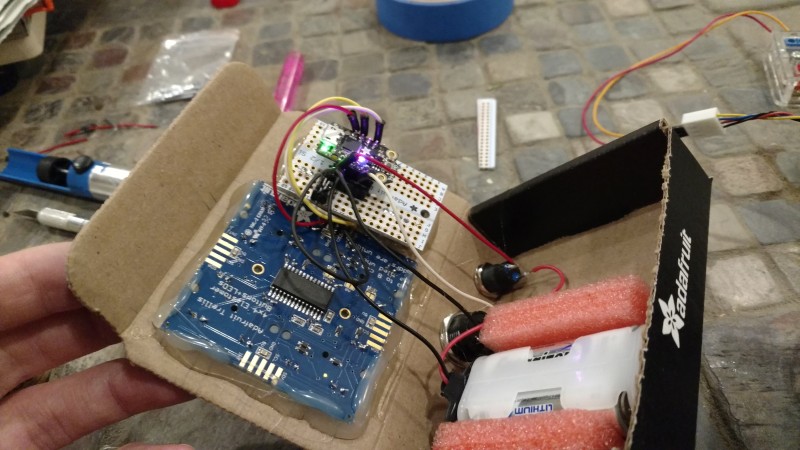
Soldering together the perma-proto was a bit of an exercise in trying to not overlap pins. I ended up soldering the display headers to one side, and the rest (Trinket, button, power) headers to the other. Thankfully, most of the pins on the 14-segment display are not connected - only the power and I2C pins are used. Hence, the Trinket M0 can fit between these and power can be pulled out. Also, the perma-proto was a tad to big to fit in the cardboard with the Trellis, so I sawed off the end and both sides.
Here’s the fully wired interior:
Code
The full source is on Github, but I’ll pull out a few snippets here to discuss design choices.
The code can be split into; 1) logic to switch between modes and 2) the logic for each mode.
For the buttons, I use a helper class that provides some useful button functions. Instead of just “is the button pressed?” it also has functions to answer “was the button just pressed” and “was the button just released”.
The bulk of the button logic is done in the update function, which checks the current state and compares it to the previous state. This function needs to be called before the “check” functions (.pressed(), just_pressed(), and just_released()):
class Button():
    """ Button convenience class.

    Create a button:
    >>> button = Button(board.D3, digitalio.Pull.UP)
    Update the button state:
    >>> button.update()
    And then check for conditions:
    >>> if button.pressed():
    >>>     ...
    >>> if button.just_pressed():
    >>>     ...
    >>> if button.just_released():
    >>>     ...
    """

    ...

    def update(self):
        """ Read the current button state and update internal state.
        """
        # Update the last state
        self.last_state = self.state
        # Read the current state
        if self.mode == digitalio.Pull.DOWN:
            self.state = self.button.value
        elif self.mode == digitalio.Pull.UP:
            self.state = not self.button.value
        # Update the pressed / released states
        self.edge_up = self.state and not self.last_state
        self.edge_down = not self.state and self.last_state
With this helper class, we can do some interesting ways of changing the mode. To prevent accidental mode changes, we can require that the mode button be held down, and then the select button pressed. Then when the desired mode is selected, releasing the mode button will create a new “game” in that mode. Alternative we can create a new game by pressing (and releasing) the select button.
# Change modes
button_mode.update()
button_sel.update()

if button_mode.pressed():
    if button_sel.just_released():
        MODE = (MODE + 1) % len(MODE_LABELS)
    display.print(MODE_LABELS[MODE])
else:
    if button_mode.just_released() or button_sel.just_released():
        init()
In retrospect, kiddo had some difficultly holding down the mode button to select a game, so I removed that function, and instead when the mode button is released, it increments the mode.
# Change modes
button_mode.update()
button_sel.update()

if button_mode.just_released():
    MODE = (MODE + 1) % len(MODE_LABELS)
    display.print(MODE_LABELS[MODE])
if button_sel.just_released():
    init()
To simplify the game logic, we just use a switch, and keep most of the variables needed for the game modes as global variables:
# Main logic
if MODE == FREE:
    logic_free()
elif MODE == GAME:
    logic_game()
elif MODE == ADD:
    logic_add()
elif MODE == SUB:
    logic_sub()
Now onto the fun part - the particular modes:
Free play
Freeplay is the easiest mode - initialize to an empty grid and toggle the button when pressed.
def init_free():
    trellis.led.fill(False)


def logic_free():
    """ Free play

    Trellis button press changes LED state.
    """
    just_pressed, released = trellis.read_buttons()
    for b in just_pressed:
        trellis.led[b] = not trellis.led[b]
Game mode
In game mode, a button press changes not only that button, but the neighboring buttons. The goal is to go from a mixed-board state to a full-on or full-off state.
We just have to watch for the edge cases - literally. If the button pressed is near the edge, we don’t want to overflow and switch states on another row. So for this case, we convert the button index to (i, j) coordinates and do not switch elements beyond the bounds of the grid.
def game_button_press(b):
    """ Invert button b and neighbors.
    """
    print("game button: ", b)
    # Convert button index to row and column
    i = b // 4
    j = b % 4
    # Get coordinates of button and neighbors
    px = [(i, j), (i-1, j), (i+1, j), (i, j-1), (i, j+1)]
    for (i, j) in px:
        if (0 <= i) and (i < 4) and (0 <= j) and (j < 4):
            idx = (i * 4) + j
            trellis.led[idx] = not trellis.led[idx]
The fun bit is to initialize - start with a full grid, and then randomly push buttons a random number of times.
def init_game():
    """ Create a new random game board.

    "press" a random button between 8-12 times
    """
    trellis.led.fill(True)
    for press in range(random.randint(8, 13)):
        b = random.randint(0, 16)
        game_button_press(b)
        display.print(press)
        time.sleep(0.2)
The button logic is virtually the same as the free play mode, but we replace the toggle with our new game_button_press function.
def logic_game():
    """ Game play

    Trellis button press inverts button and neighbors.
    """
    just_pressed, released = trellis.read_buttons()
    for b in just_pressed:
        game_button_press(b)
Addition game
Another mode is an addition game, where we display an addition problem and you have to illuminate the correct number of buttons. A variant would be numbering the buttons and have to press the result.
def init_add():
    """ Create a new addition problem

    Choose a + b = c such that a, b < 10, and c <= 16
    These conditions ensure that "a+b=" is pritable, and reachable
    """
    global addition_goal

    trellis.led.fill(False)
    a = random.randint(1, 9)
    b = random.randint(1, 16 - a)
    if b > 9:
        b = 9
    c = a + b
    display.print("{a:d}+{b:d}=".format(a=a, b=b))
    print(a, b, c)
    addition_goal = c
Our initialization function is now a bit more complicated.
We pick two numbers that sum to 16, the first we can specify that a is between 1 and 9 (inclusive).
The second could exceed 9 (eg; 16 - 1), so we cap our second integer at 9.
Note that we use the global variable addition_goal so we can reference it in our logic_add function.
def get_active():
    """ Return an array of pressed buttons.
    """
    return [ii for ii in range(16) if trellis.led[ii]]


def logic_add():
    """ Game play

    Toggle buttons and see if we "win".
    """
    global addition_goal

    just_pressed, released = trellis.read_buttons()
    for b in just_pressed:
        trellis.led[b] = not trellis.led[b]

    active = get_active()
    print(len(active), addition_goal)
    if len(active) == addition_goal:
        display.print(" ={c:2d}".format(c=addition_goal))
        for b in range(16):
            trellis.led[b] = not trellis.led[b]
We want a bit of a visual “bang” when we reach the correct number, so we invert the keypad colors when the correct answer is reached. This actually turned into a really neat result;
- it let’s you toggle lights back to the solution again,
- when the correct answer is 8 (half of the display) - the display starts to alternate between modes.
Subtraction game
The subtraction game is similar to the addition game, we just have to specify the initial conditions somewhat differently;
def init_sub():
    """ Create a new subtraction problem

    Choose a - b = c such that a > 1, b > 0, and c > 0
    """
    global subtraction_goal

    trellis.led.fill(False)
    a = random.randint(1, 9)
    b = random.randint(0, a)
    c = a - b
    display.print("{a:d}-{b:d}=".format(a=a, b=b))
    print(a, b, c)
    subtraction_goal = c
Minimizing code
At the end of implementing all of these game functions, I started to get some warnings that there were issues in importing modules. Of course the microcontroller has limited memory and at some point we start running into that limit. As a result, I had to trim out some excess code - print statements, un-needed branches, etc.
Assembly
With the pad prototyped and programmed, we can now add some visual “polish”. I think many people would 3D print a case, but cardboard works great as well.
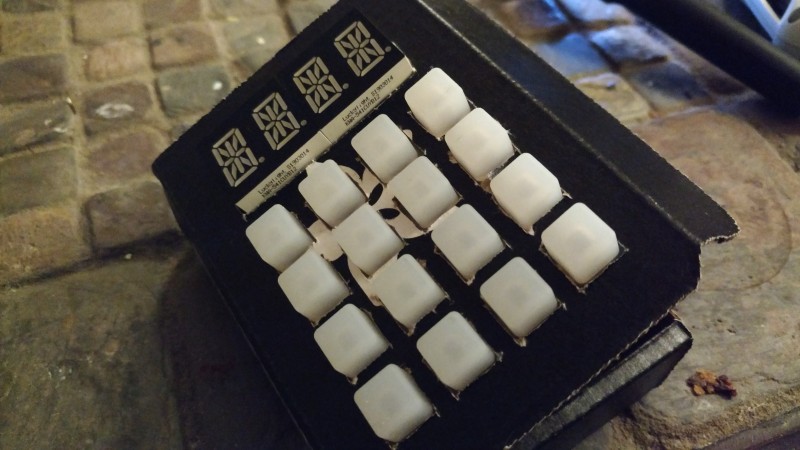
To install the components, you can trace their outline and then cut out the matching hole. The 14-segment display is the easiest - just trace around on the back of the cardboard, and cut the window out with an xacto-knife. Similarly, trace the button pad and cut out holes for each of the buttons. It may hold together better if you cut a hole for each button, rather than a larger hole for the entire pad. Once, they’re in place, hot glue the display and button pad into place. The pushbuttons usually have a nut to keep them in place. You can use the interior of this nut to trace the hole for the button. Cut out the hole, thread the button through, and secure into place with the nut.
I always want to always re-use components so instead of soldering the components directly into the perma-protoboard, I solder in headers and plug in the components later. This is also useful, as to fit all the parts, I had to install components on both sides of the perma-protoboard.
When wiring the power to the Trellis, I found that the V_usb pin works better when plugged into usb (delivering 5V). But when running from 2xAA batteries (2 x 1.7V = 3.4V) the V_usb doesn’t put out a consistent 5V. As a result, it’s better to plug in the Trellis to the V_batt pin and let it run off of the 3.4V. However, V_batt doesn’t drive the Trellis well when on USB.
Conclusion
With a straightforward circuit diagram (ground, power, SDA, SCL, and 2x digital button pins) this project was quick to prototype. You may have some difficultly getting everything to fit in a box though!
With the assembly done, you can really let your programming go wild though. I demonstrated a few simple modes here, but some other neat modes would be:
- calculator
- tetris
- Conway’s game of life