Jekyll2025-03-25T22:55:41+00:00/feed.xmlKevin E ClaytorI'm a physicist and tinkerer.House Temperature Logging2023-09-24T00:00:00+00:002023-09-24T00:00:00+00:00/2023/09/24/house-temperature-adafruit-ioI was interested in temperature, humidity monitoring around the house to see if there were any trends, or if the basement was getting too humid.
In particular, looking for a low-effort way to get data into a dashboard, I was eager to try out the AdafruitIO framework.
They limit you to two managed whippersnapper devices (but you can have more using your IO key), and 10 feeds (this is the real limiter, with each stream of data being one feed).
Wippersnapper (~1 hr from Zero)
Spent a few minutes installing the drivers.
After installing the drivers, query for devices, erase the flash, and install the wippersnapper flash:
It appears in their UI right away, adding the MCP9808 was trivially easy, and it started reporting data right away.
One big downside is the lack of components.
For instance, I have the TSL2561 Lux sensor, but only the TSL2591 is supported.
Similarly, I have the VL53L1X, but only the VL53L0X is supported.
This includes the development devices (currently).
Arduino (~2hr from Zero)
Took about about an hour configuring the ardunio boards manager (finding the ESP32 was the hardest).
A note on the IO_FEED name, this points to the “key” in the feed, which is generated when you generate the feed name, it is typically an “API-safe” version of the group.name that you configured when creating the feed.
main.c
/**************************************************************************//* Log MCP9808 data to Adafruit IO *//**************************************************************************/#include"config.h"
#include<Wire.h>
#include"Adafruit_MCP9808.h"// Create the MCP9808 temperature sensor objectAdafruit_MCP9808tempsensor=Adafruit_MCP9808();// set up the 'temperature' and 'humidity' feedsAdafruitIO_Feed*temperature=io.feed(IO_FEED);voidsetup(){// start the serial connectionSerial.begin(115200);// wait for serial monitor to openwhile(!Serial);// Connect to the MCP9808if(!tempsensor.begin(0x18)){Serial.println("Couldn't find MCP9808!");while(1);}Serial.println("Found MCP9808!");tempsensor.setResolution(3);// connect to io.adafruit.comSerial.print("Connecting to Adafruit IO");io.connect();// wait for a connectionwhile(io.status()<AIO_CONNECTED){Serial.print(".");delay(500);}// we are connectedSerial.println();Serial.println(io.statusText());}voidloop(){// io.run(); is required for all sketches.// it should always be present at the top of your loop// function. it keeps the client connected to// io.adafruit.com, and processes any incoming data.io.run();// wake up, and take a measurementtempsensor.wake();floatfahrenheit=tempsensor.readTempF();// Log to the serialSerial.print("Temp: ");Serial.print(fahrenheit,4);Serial.println("*F.");// save fahrenheit (or celsius) to Adafruit IOtemperature->save(fahrenheit);// shutdown MSP9808 - power consumption ~0.1 mikro Amperetempsensor.shutdown_wake(1);// Delay until the next cycledelay(IO_SLEEP_MS);}
ESP32
I have the ESP32-WROOM-32 board.
Unfortunately, I was not able to find the Ardunio library for this board.
Similarly, I only found the -v2 circuit python implementation, which I was able to flash to the board;
I think it will be easier to use a circuitpython board that appears as a drive, and then air-lift it into wifi.
MagTag
Setup the MagTag light sensor with the rest of the house dashboard.
Setup the buttons to also pull in data.
Setup the neopixel to display colors.
Linked the buttons to the neopixel by creating an action from the button (any new data) to publish to the neopxiel feed a value.
HINT: Bump down the limit to every 10s for a more reactive button pressing activity.
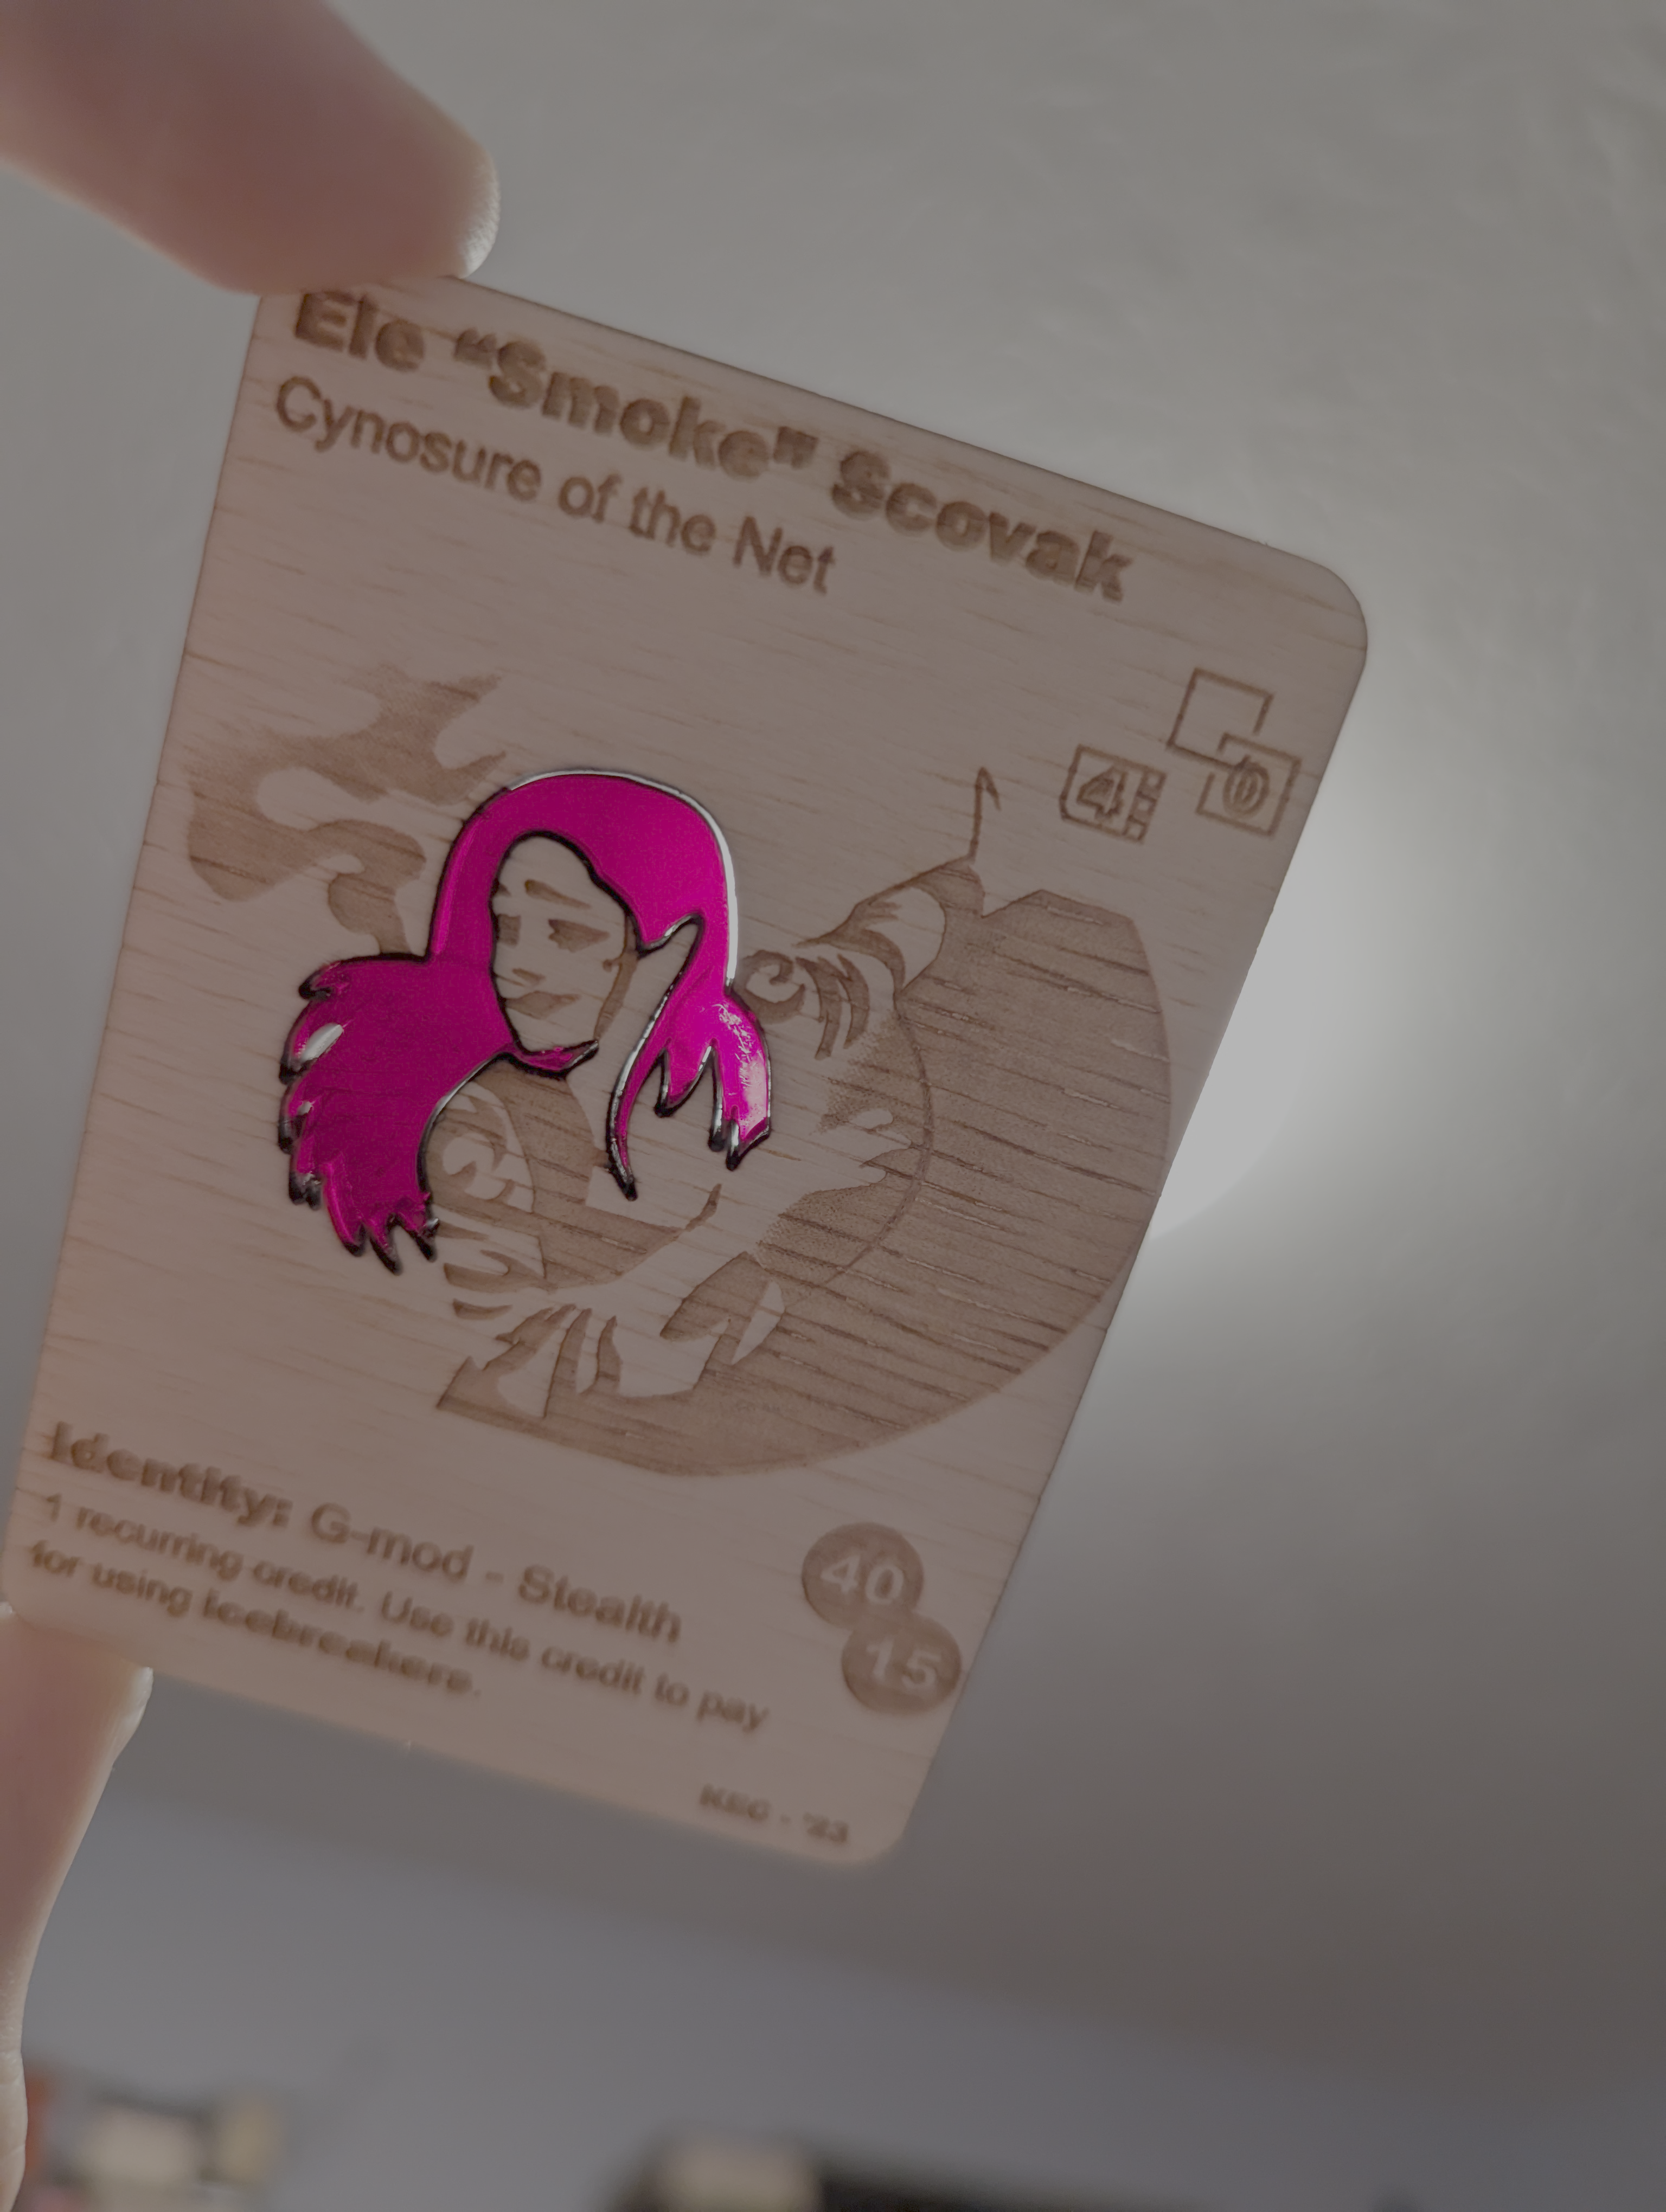
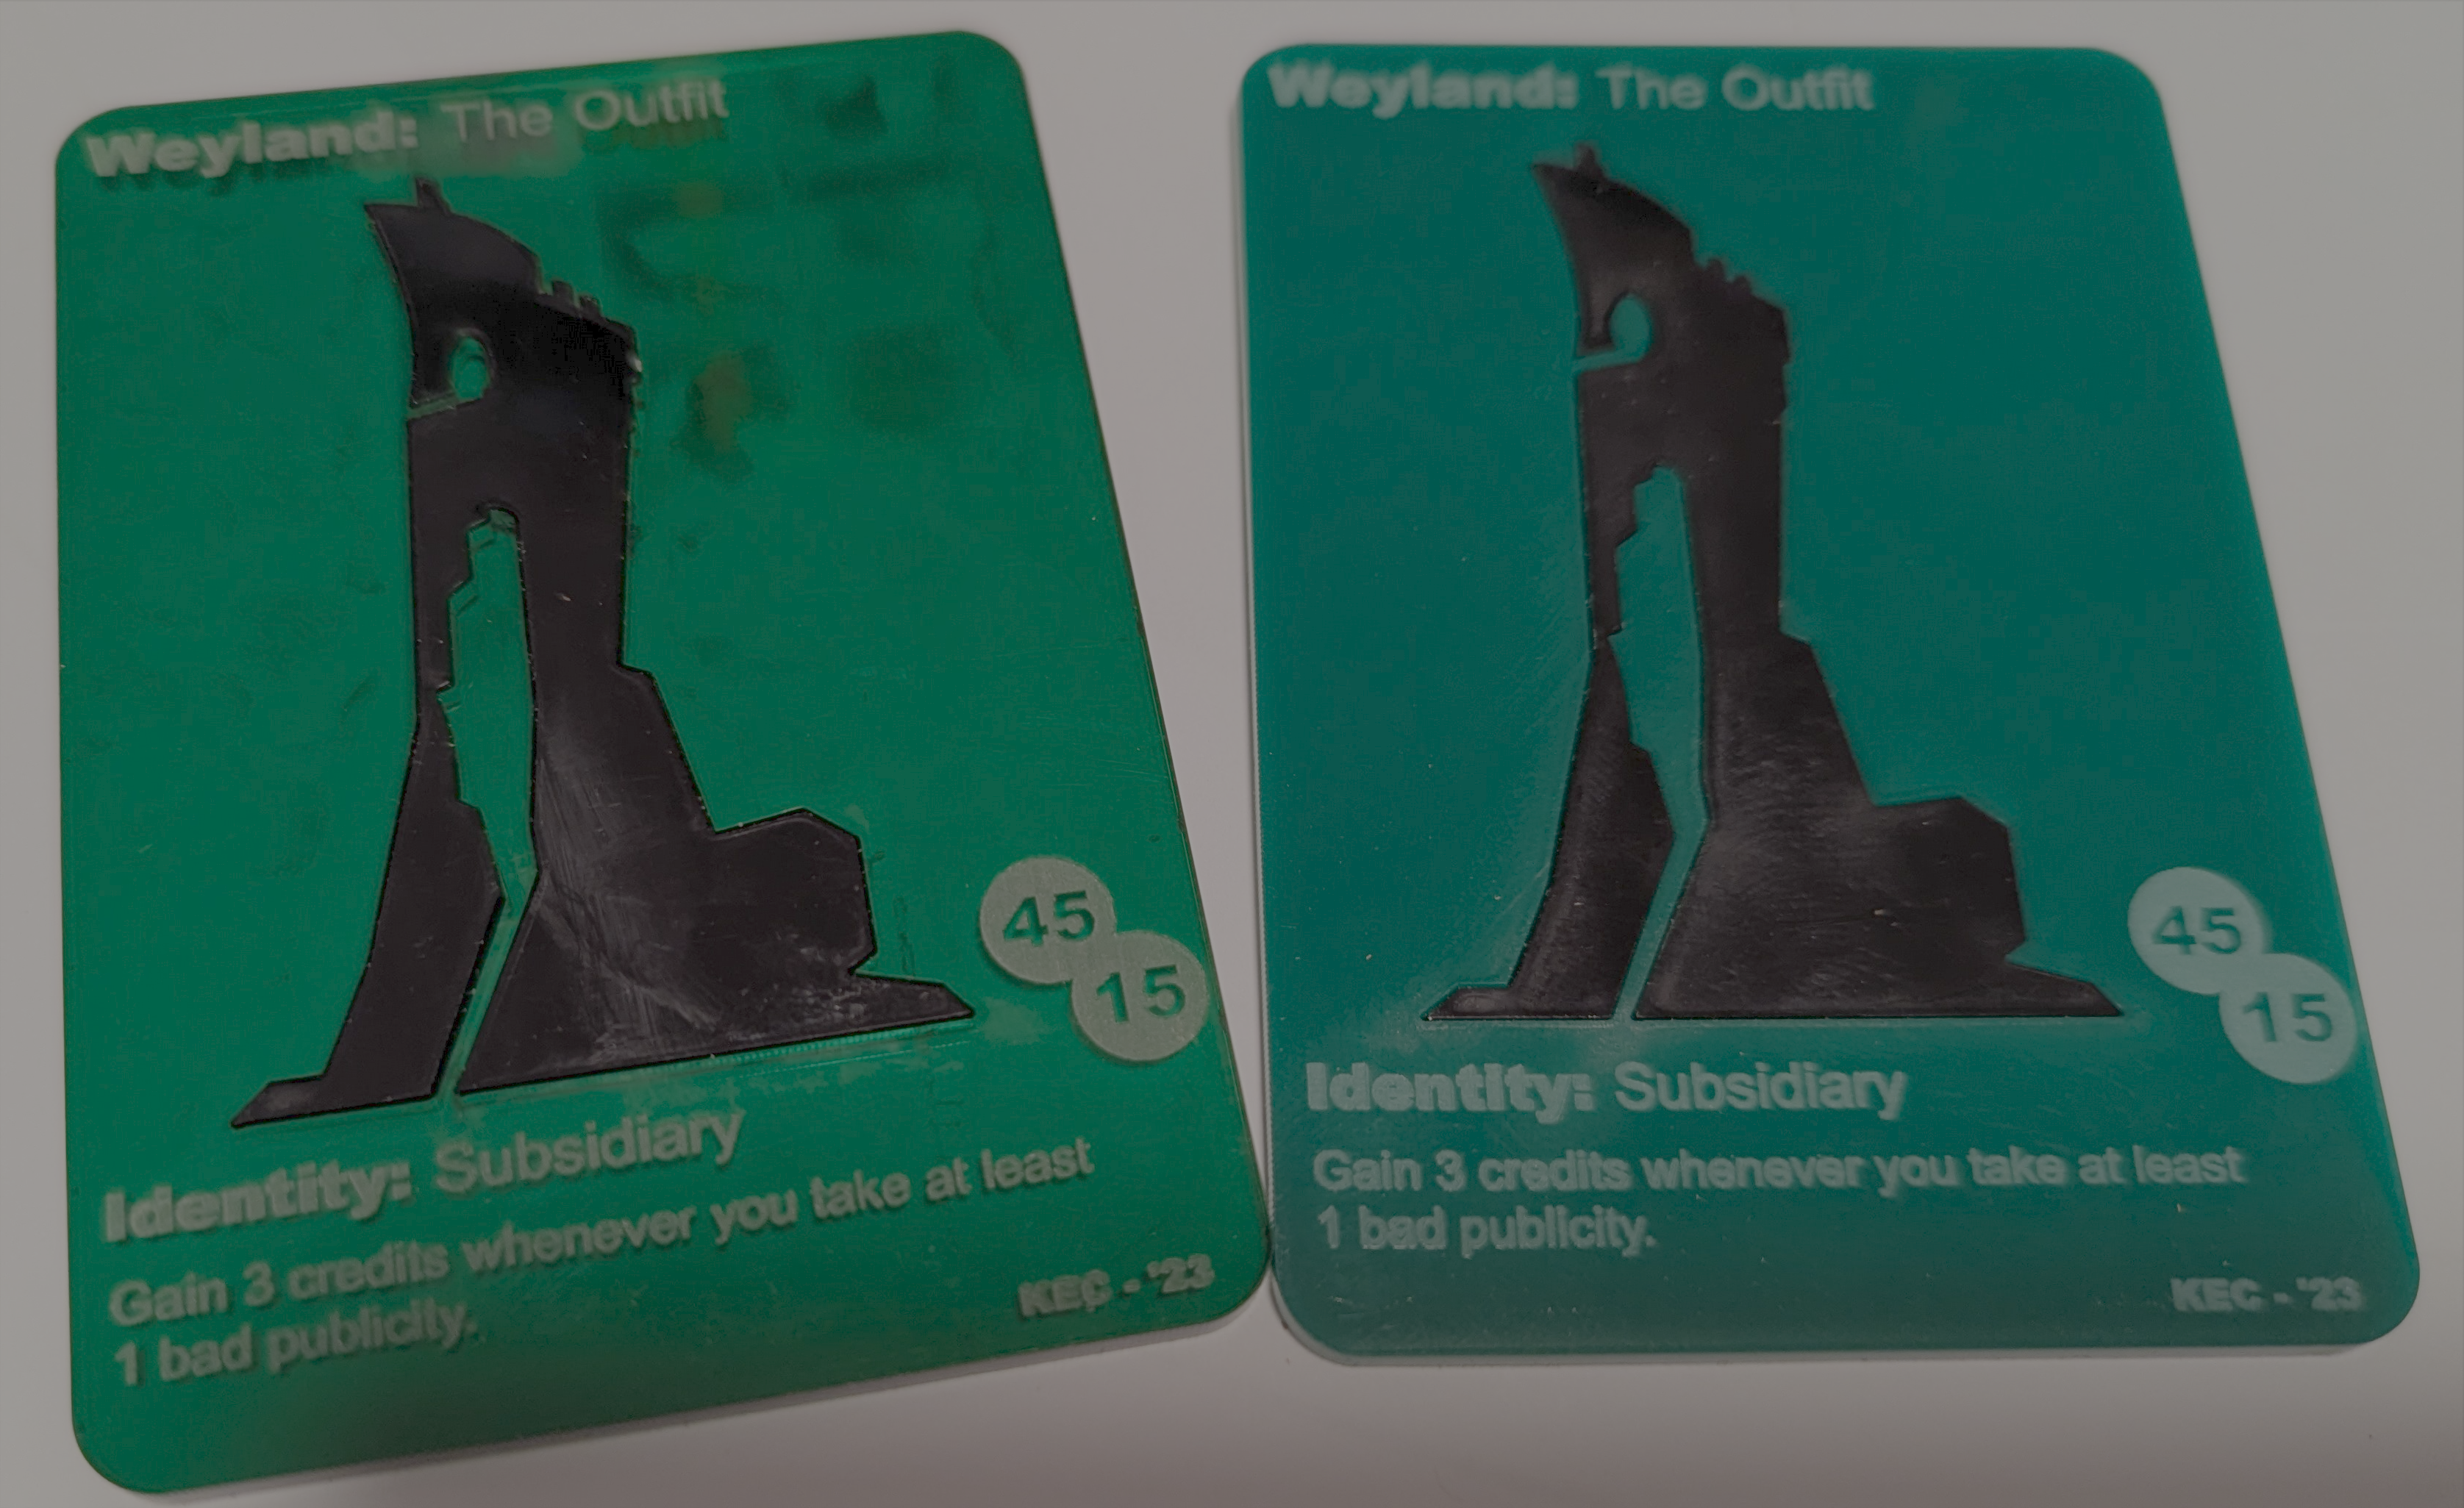
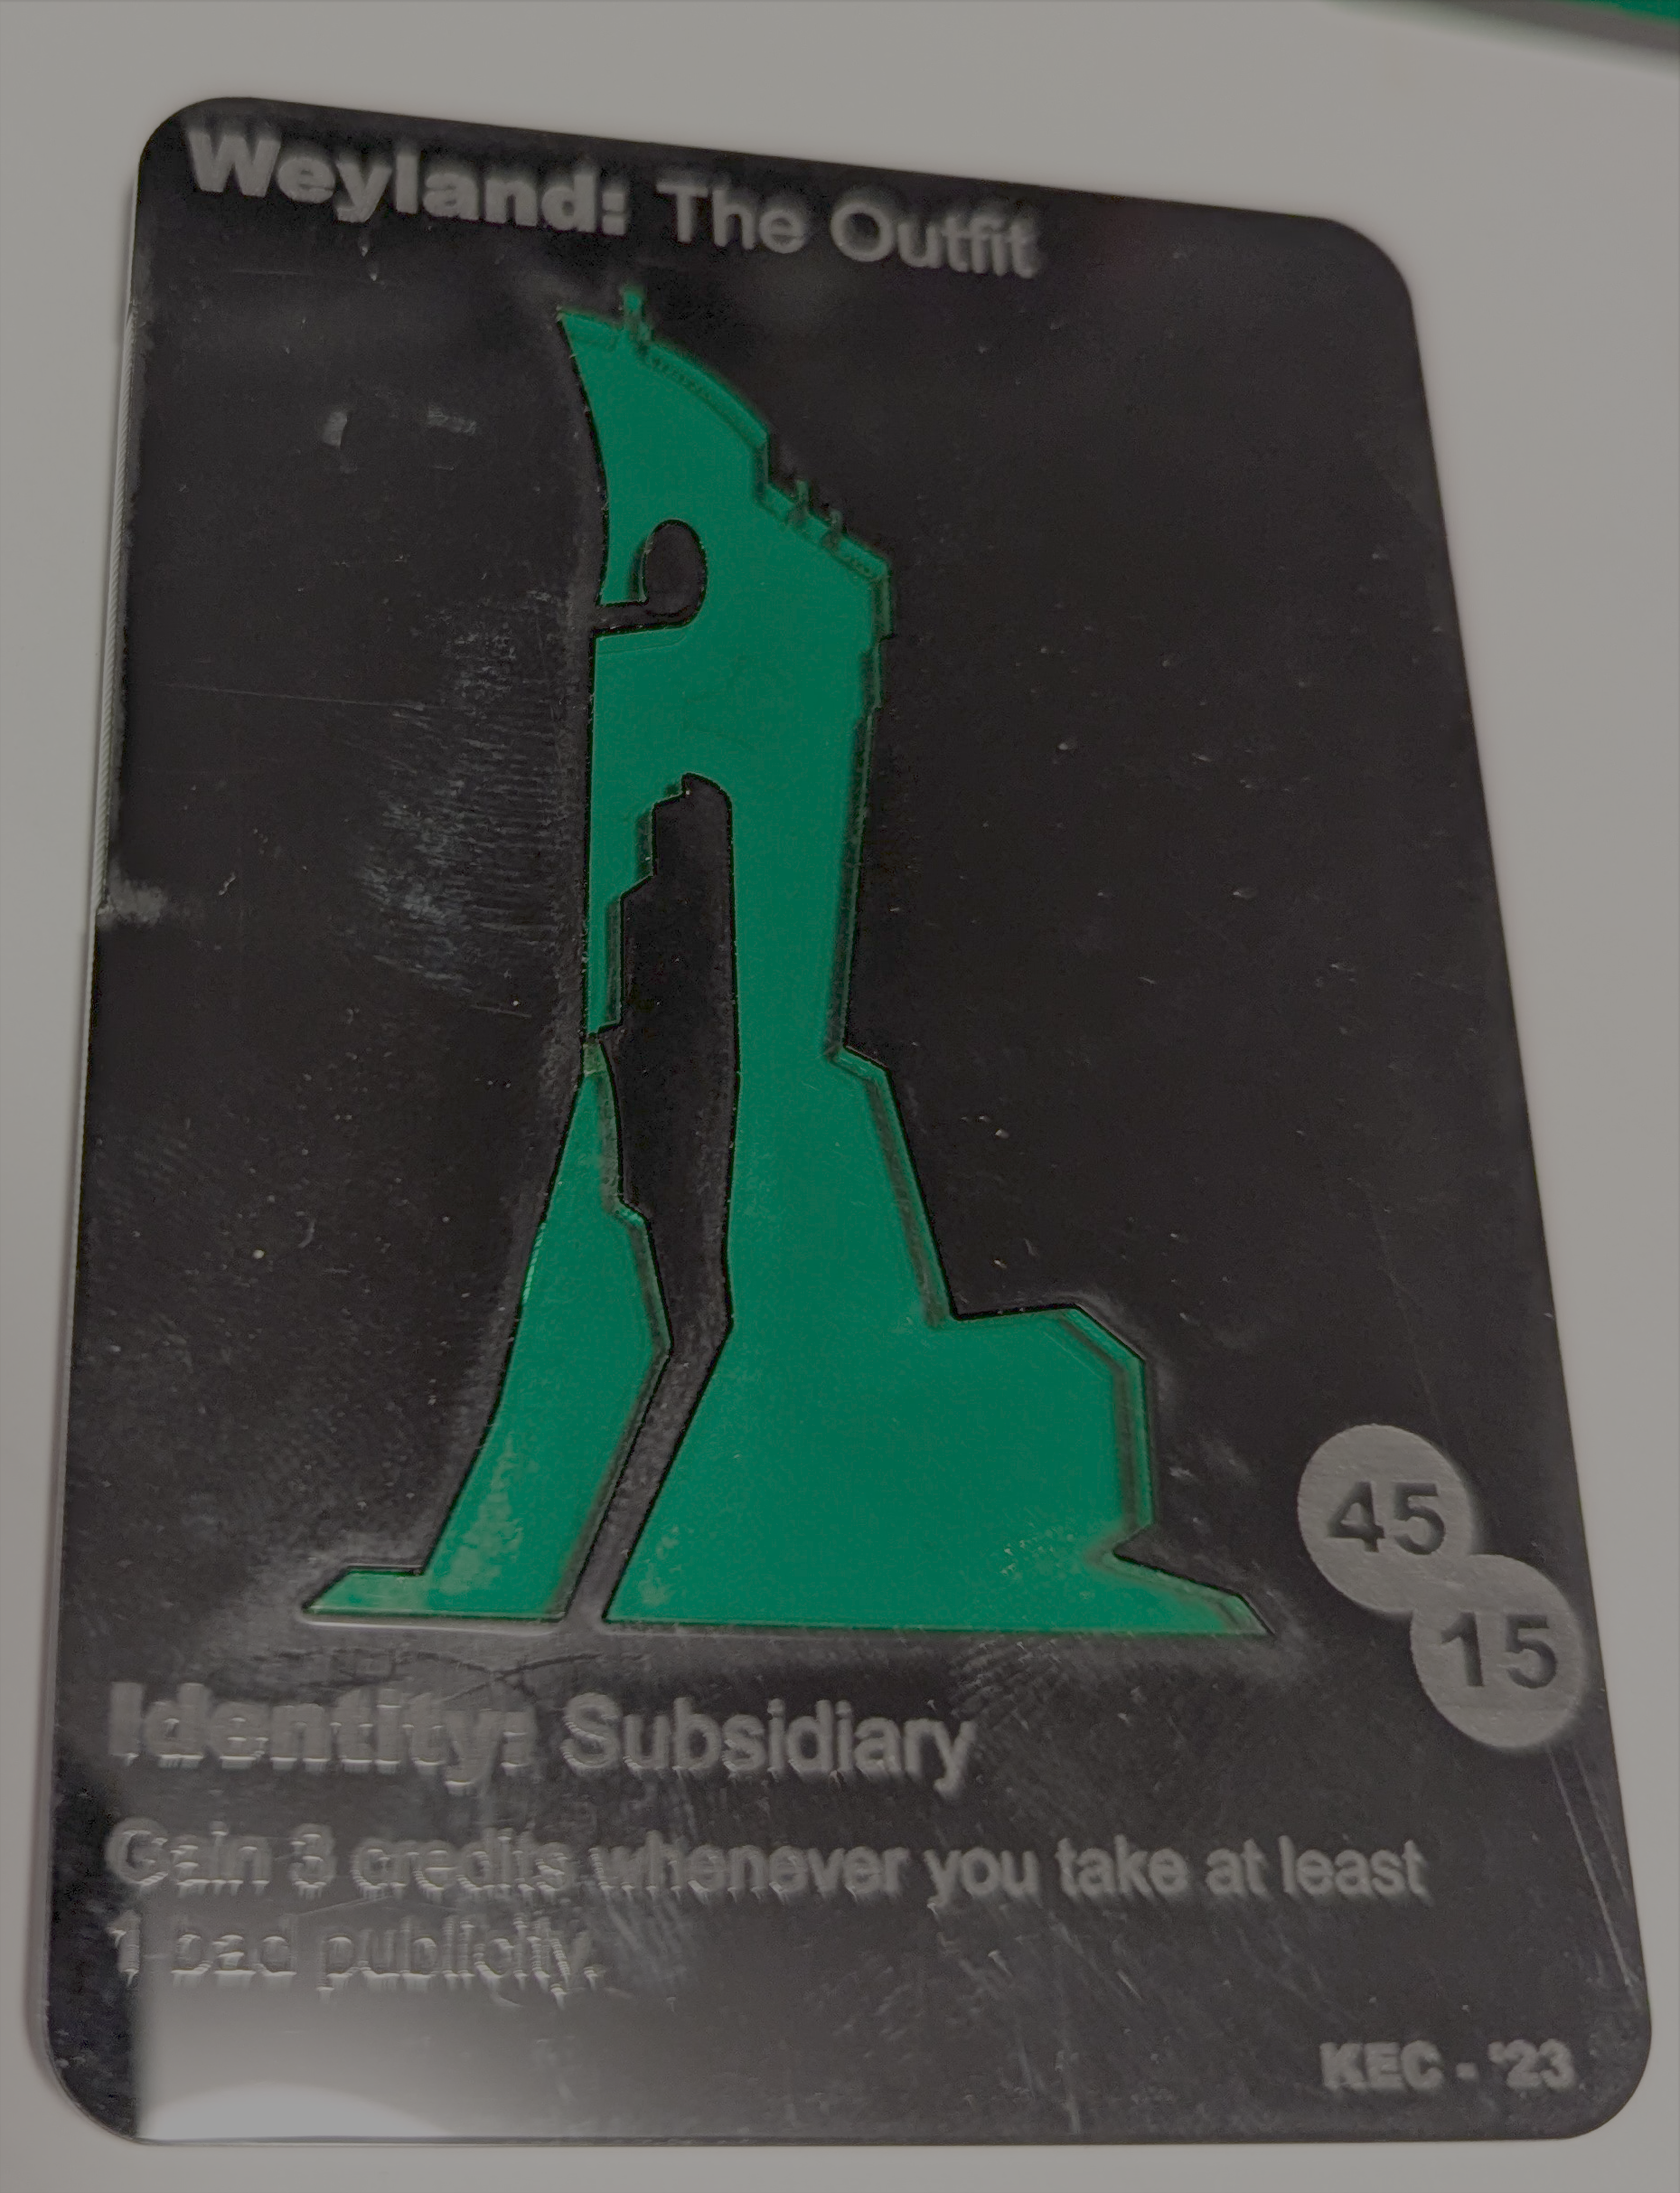
]]>K. E. ClaytorNetrunner Laser-Cut Identities (Smoke & Outfit)2023-07-29T00:00:00+00:002023-07-29T00:00:00+00:00/2023/07/29/netrunner-ids-2After the success of the last Netrunner laser-cut ID’s I thought I would do another set for East Coast Nationals 2023.
This was right before Smoke (one of my favorite runners) was going to rotate, and The Outfit was doing super strong, so I had an easy time deciding what to do.
For this one, however, I had recently learned about inlaying and adjusting for the laser kerf (the width of the cut).
Basically, what you do is you take the inlay and enlarge it uniformly by ~0.04” or whatever your kerf ends up being, then they should press-fit tightly together.
Smoke is a wood base with an inlaid translucent red hair, and turned out better than my expectations:
I ended up making multiple outfits, as I would have a little bit of waste that I then wanted to use again.
The green translucent background shows a bit of the scorching from the cutting, but the others turned out very well - I think the black background with the translucent green inlay is my favorite.
Here are the vector art files if you’d like to make your own.
Note that I generally design them 90% in Inkscape (free) and then transfer them over to CorelDraw (paid) when I’m on the laser, since that’s what it needs.
Hence the SVG files need a bit of work to get out what you see in the images, whereas the CDR files are what I actually put into the cutter.
Smoke - (Inkscape / .svg) (hair needs to be separated) Combined
]]>K. E. ClaytorNetrunner Laser-Cut Identities2023-06-03T00:00:00+00:002023-06-03T00:00:00+00:00/2023/06/03/netrunner-idsI’ve been using the laser cutter/engraver to generate some Netrunner identities for some time, and finally got some that look really good.
Initially, I started out by turning the standard card art grayscale and etching it into 1/8” acrylic.
As you can see from the image below, my first two attempts (bottom) came out inverted, as darker colors in the image are more etching and therefore lighter in the final raster.
(Personally, I kinda like the “ghost” look, and these are some of my favorites to play with.)
Inverting the image gave nice results for shaper and criminal.
You can also see that I was toying with opaque vs. transparent acrylic - I like the look of the transparent, but it does not help the legibility.
As I was etching these, I learned;
the darker acrylic looks much better as there is higher contrast between the acrylic and etching
the result is very sensitive to grayscale levels, I could not consistently get a good looking etch
for the lighter colors you can etch a negative, then paint over it, and wash the paint off the surface to get a neat effect (for a lot of work)
At a circuit opener, I was talking with another player who had brought laser etched ids, and mentioned that I had done some initial experiments with cutting out slices of the acrylic from the card art.
While it looked very neat, it was also a lot of work - I had to sub-select specific vertices, split them off from the larger art, and ensure that just the space I wanted would get cut (vs. a larger center area falling out).
Thinking it over some more, I decided that it would be great to try with a simpler pattern.
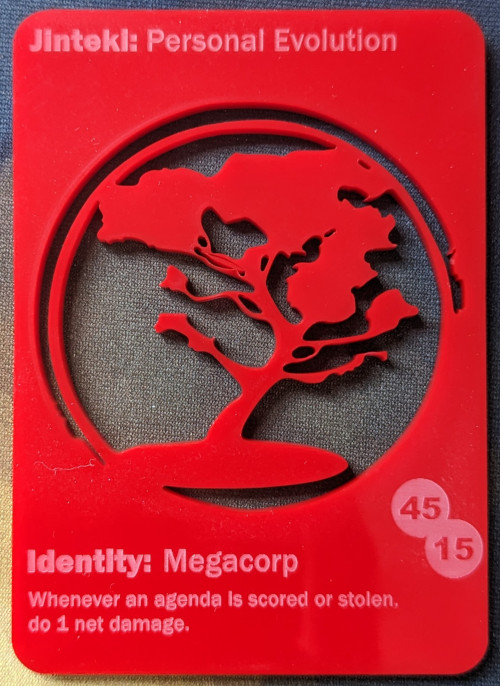
Thankfully, inkscape has a “trace bitmap” tool, so I used that to trace the Jinteki tree logo and, well, it looks awesome:
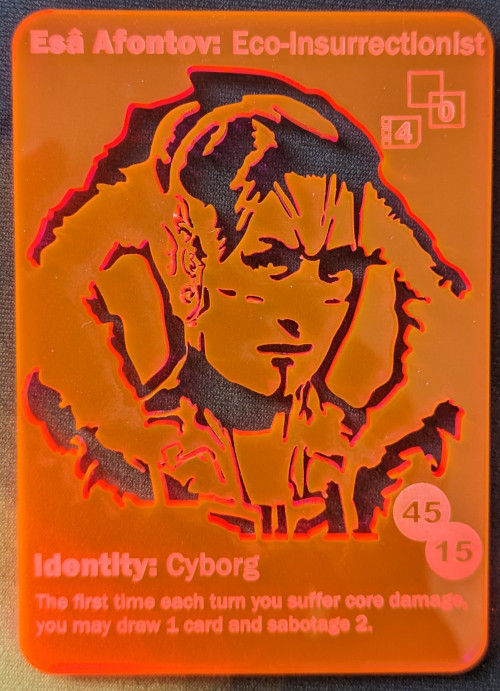
I had decided to play both PE and Esâ, so I also had do one for xir.
The art here was much more detailed, and I was getting large chunks falling out, and not really capturing the image well on the first pass.
Subsequently, I went into the vector points, and edited the large “hollow” areas on the hood to be an outline instead, and widened the hair and eyes.
I think the result looks fantastic:
(I actually forgot the link and MU icons on the first pass, and had to throw them back in the laser to etch just those portions, nearly making myself late to the CO I was playing in!)
Here are the vector art files if you’d like to make your own:
]]>K. E. ClaytorM.C. Escher Ice Cube Molds2023-01-17T00:00:00+00:002023-01-17T00:00:00+00:00/2023/01/17/escher-artWhen staying at a bed-and-breakfast they had these really neat hexagonal ice cube trays.
We picked up some of our own when we got home, but the thought was planted - “what other shapes could I do?”
Of course, one of the most interesting space-filling tiling artists of all time has to be M.C. Escher.
The Method
This was unfortunately very painstaking.
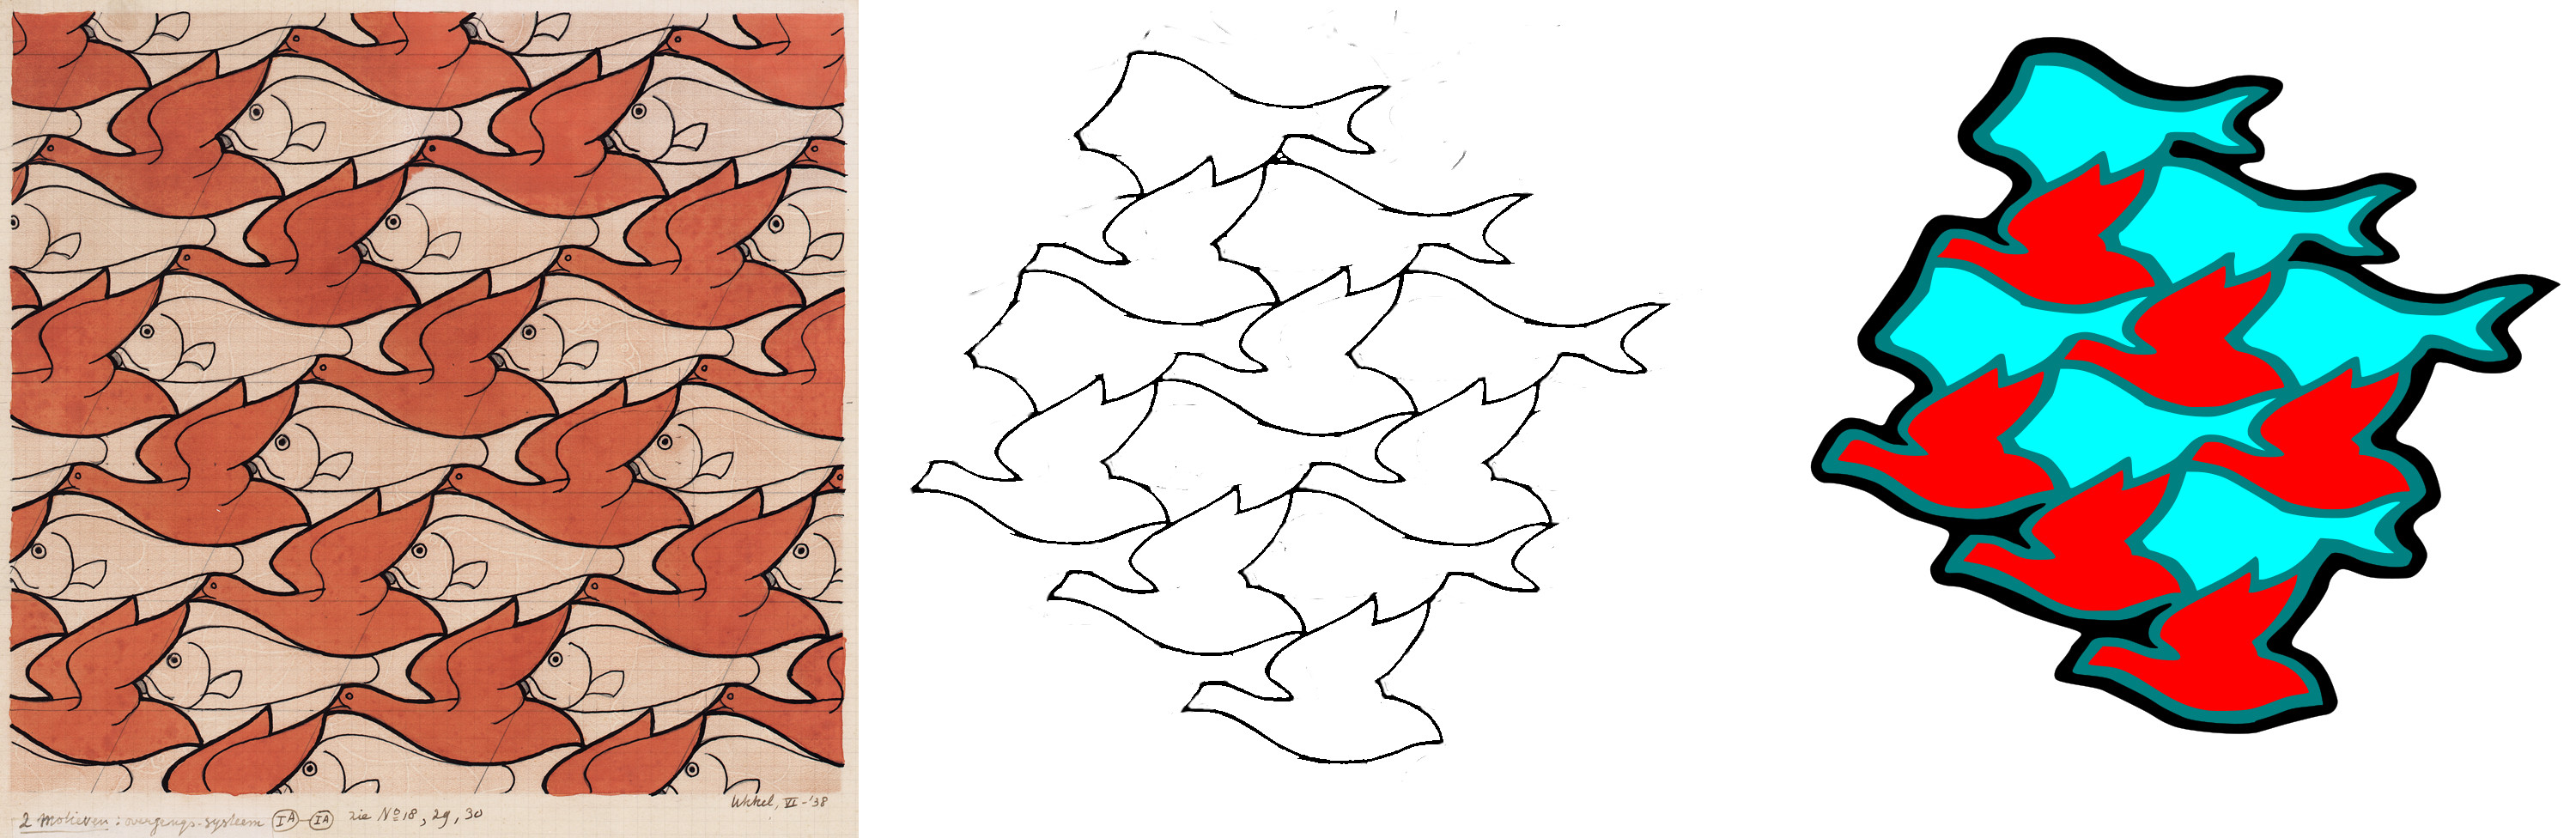
The first step was to start with the art on the left - the sketch of the bird/fish space filling pattern.
Then, in gimp I adjusted levels, brightness / contrast, and saturation, and applied a threshold to reduce the image to just the black trace lines between the bird/fish.
In the center, you can see these lines cleaned up into only the center four-by-four bird/fish pattern.
Next, I imported these into inkscape and did a vector trace (right).
This applied a lot of vector points, which I had to reduce by hand, once I had nice vector-art of just the bird/fish black lines, I made three copies. Remember, the trace of a thick line produces two vector lines, one for the interior line and one for the exterior line, and they are filled in-between.
This gave me;
just the interior lines
just the outer lines, enlarged
just the outer trace of the outer lines, enlarged
The interior lines (1) were separated and filled with the light turquoise / red in the image.
The outer lines, enlarged (2) were filled with black and form the outer wall.
The trace of the outer lines (3) form the base of the mold.
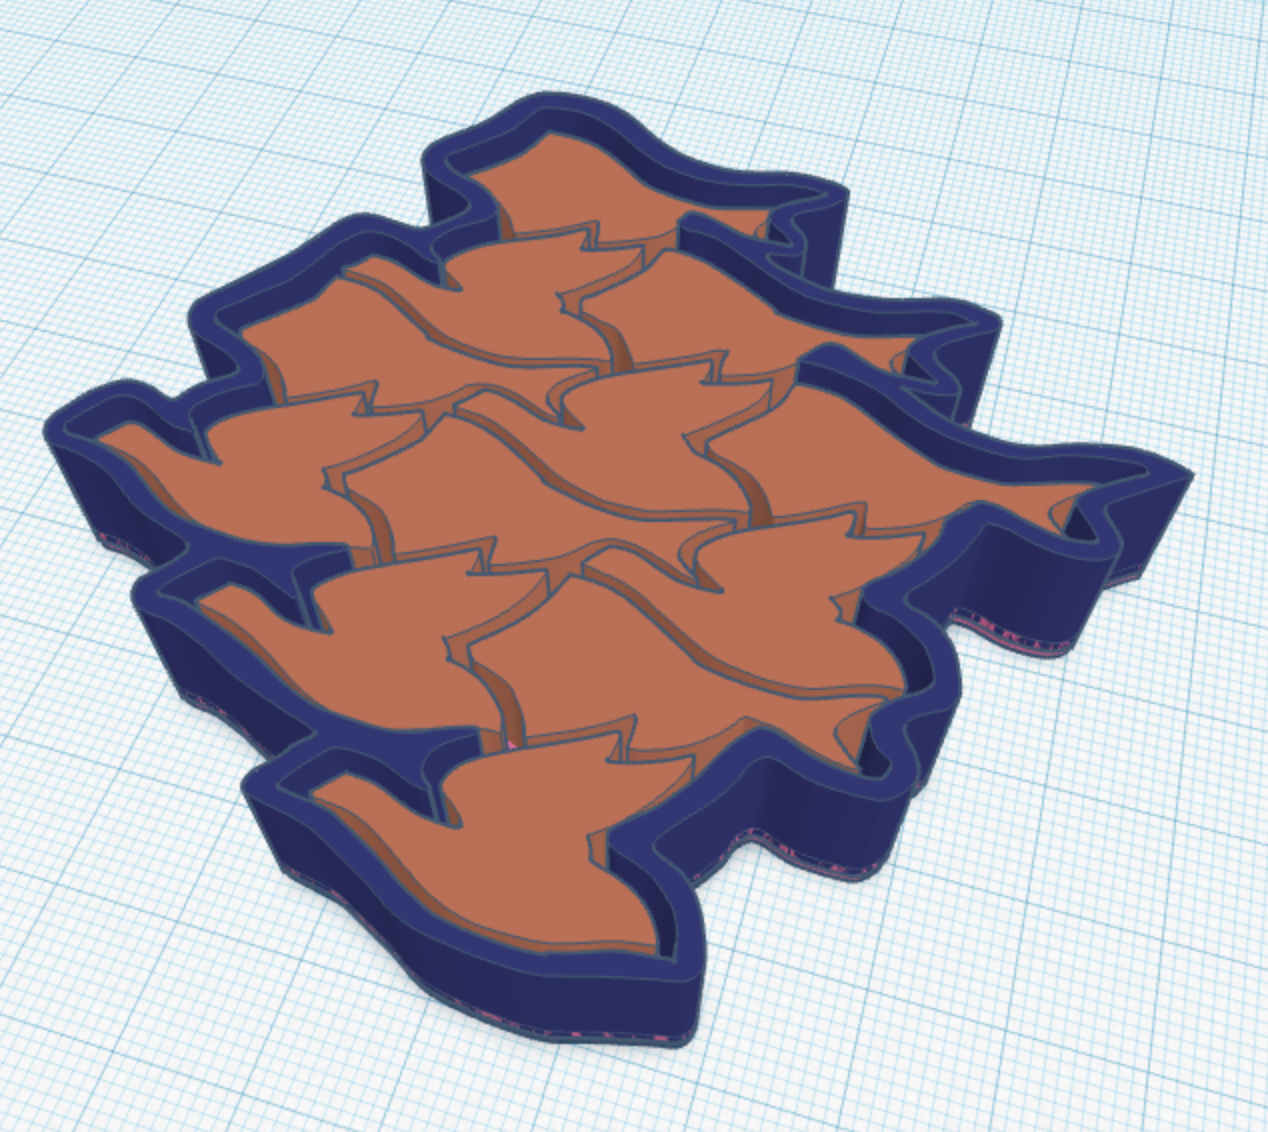
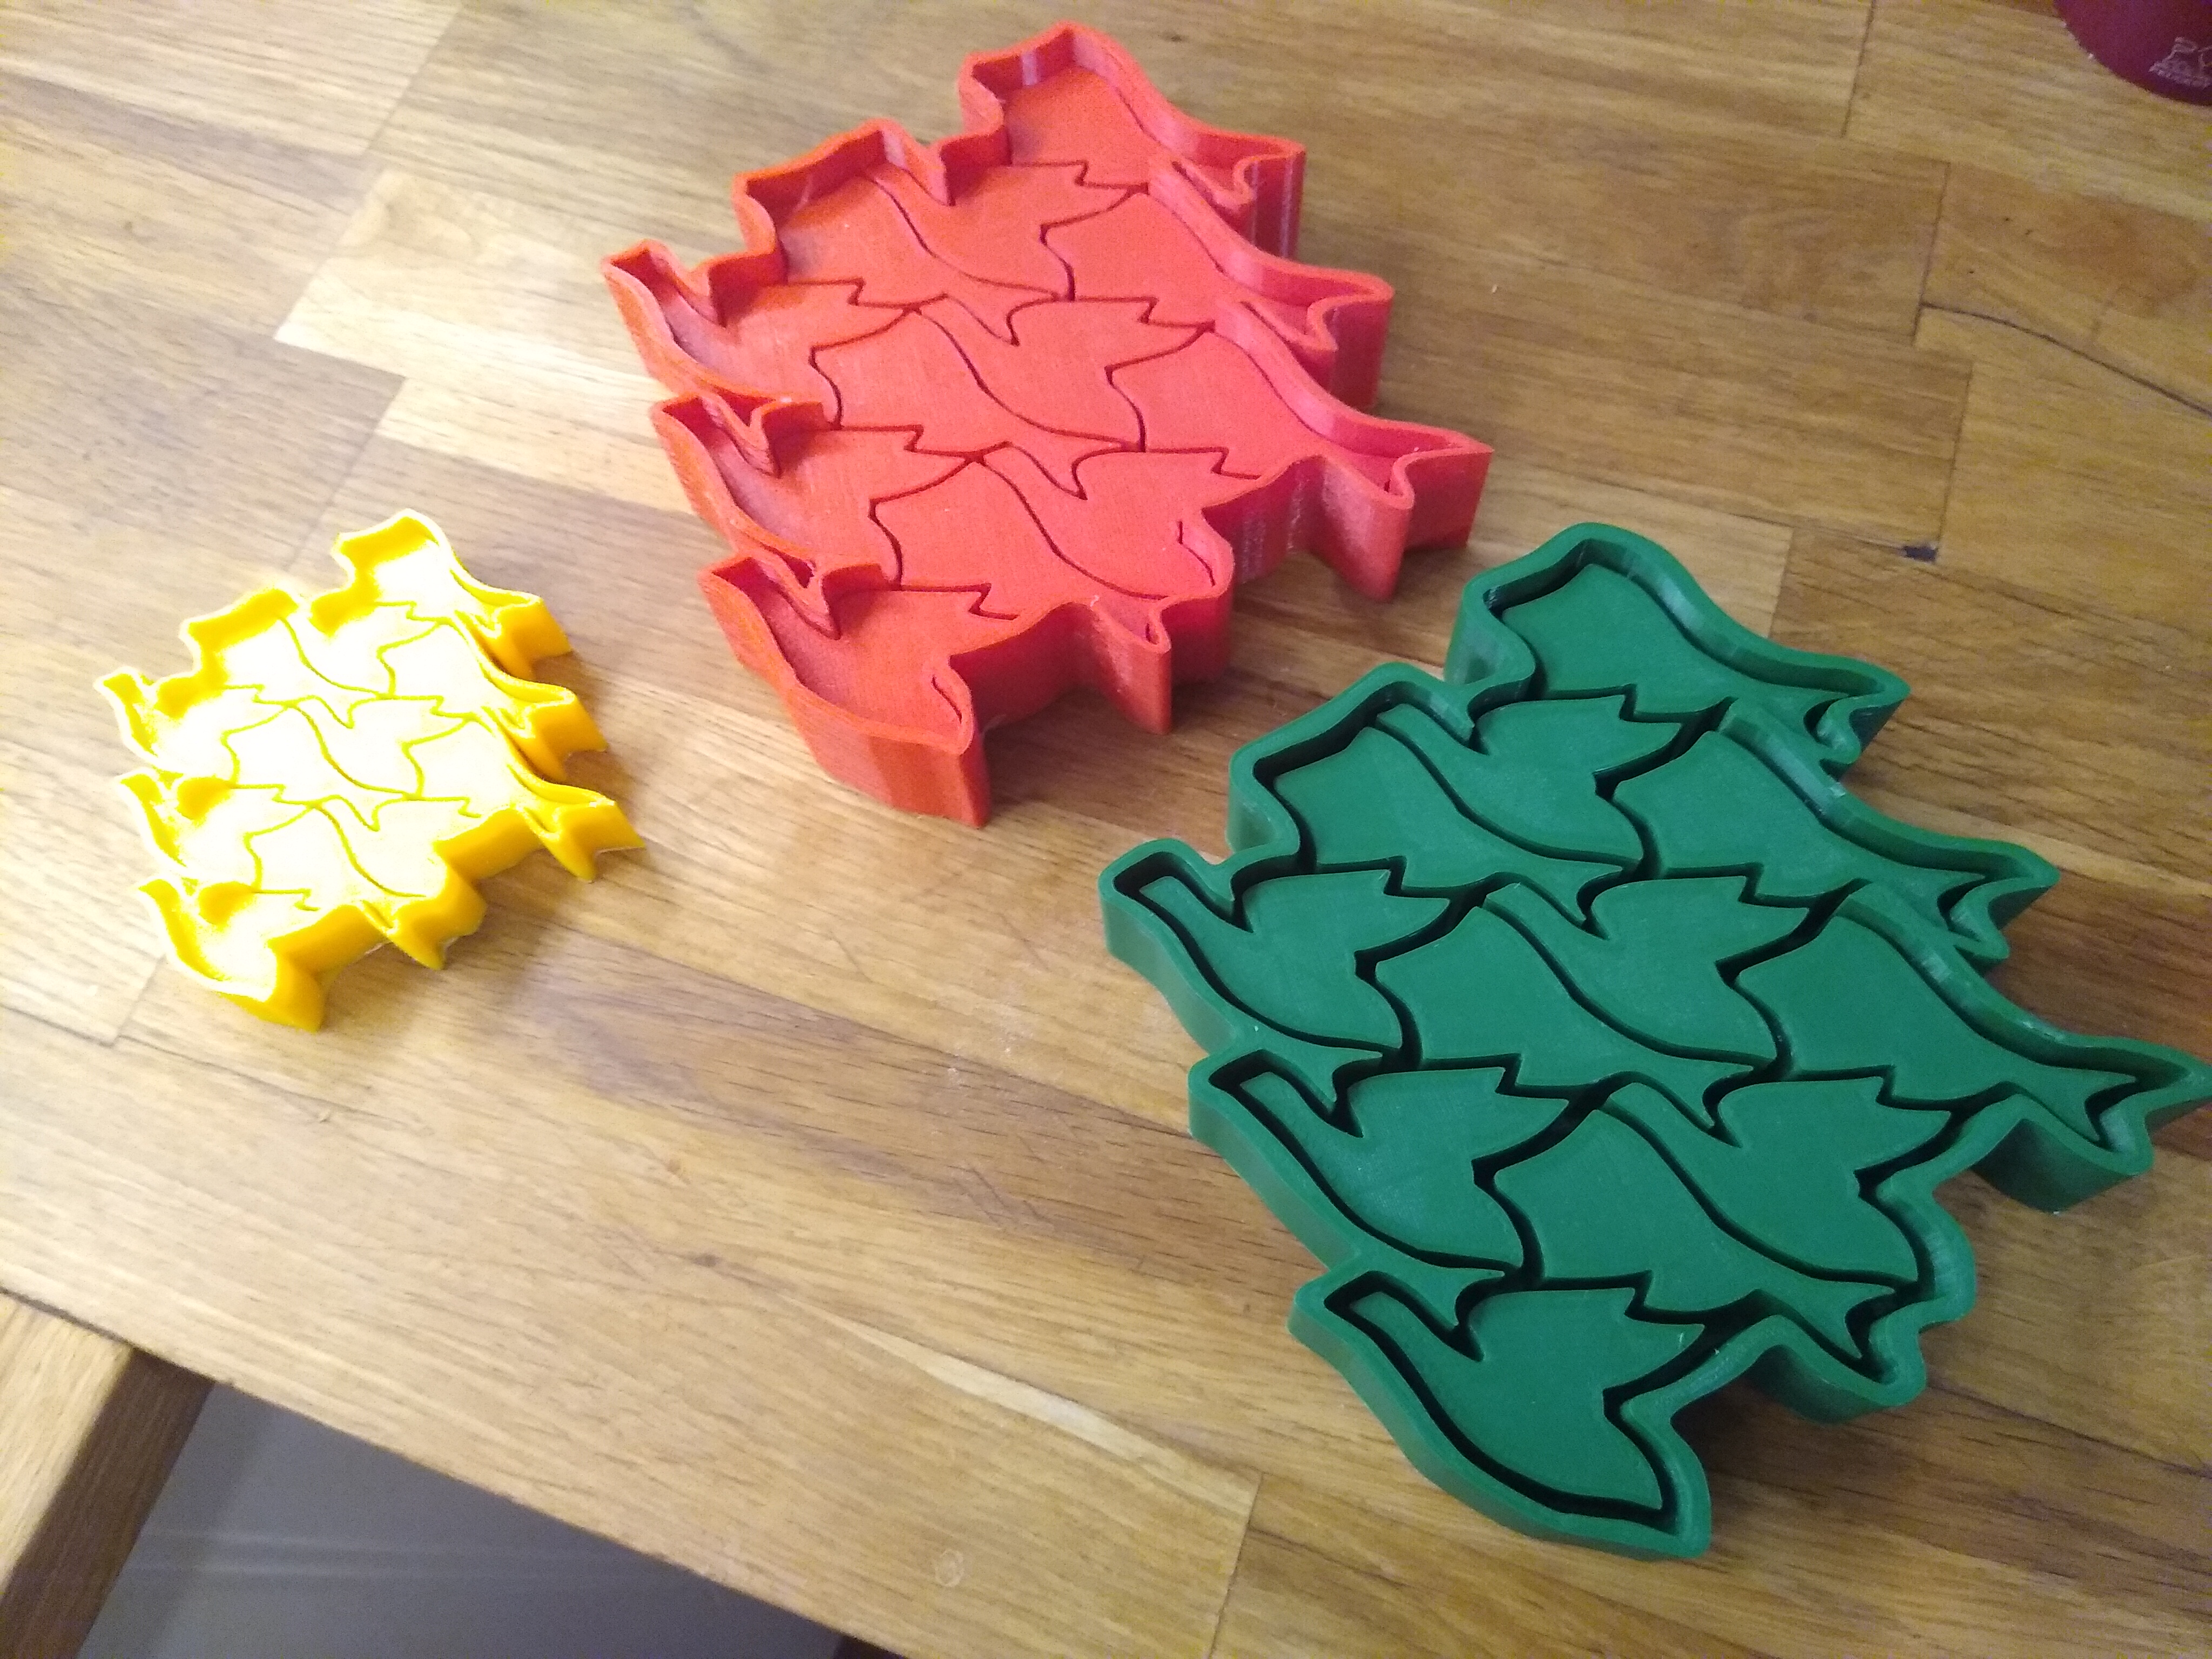
Each of these was imported into TinkerCAD and raised to a different height.
The base (3) is the shortest and supports the center pattern (1) and the wall (2), which is the tallest layer to hold the silicone in.
Once the 3D model was done, it was off to the printer.
The Molds
Naturally, I didn’t get the mold size correct the first time.
The first iteration (yellow) was much to small.
The second (red, 170% size) didn’t have enough space for the mold to flow into.
I had to head back to inkscape and manually move the verties around to get to the third (green) iteration, which was just right.
The Results
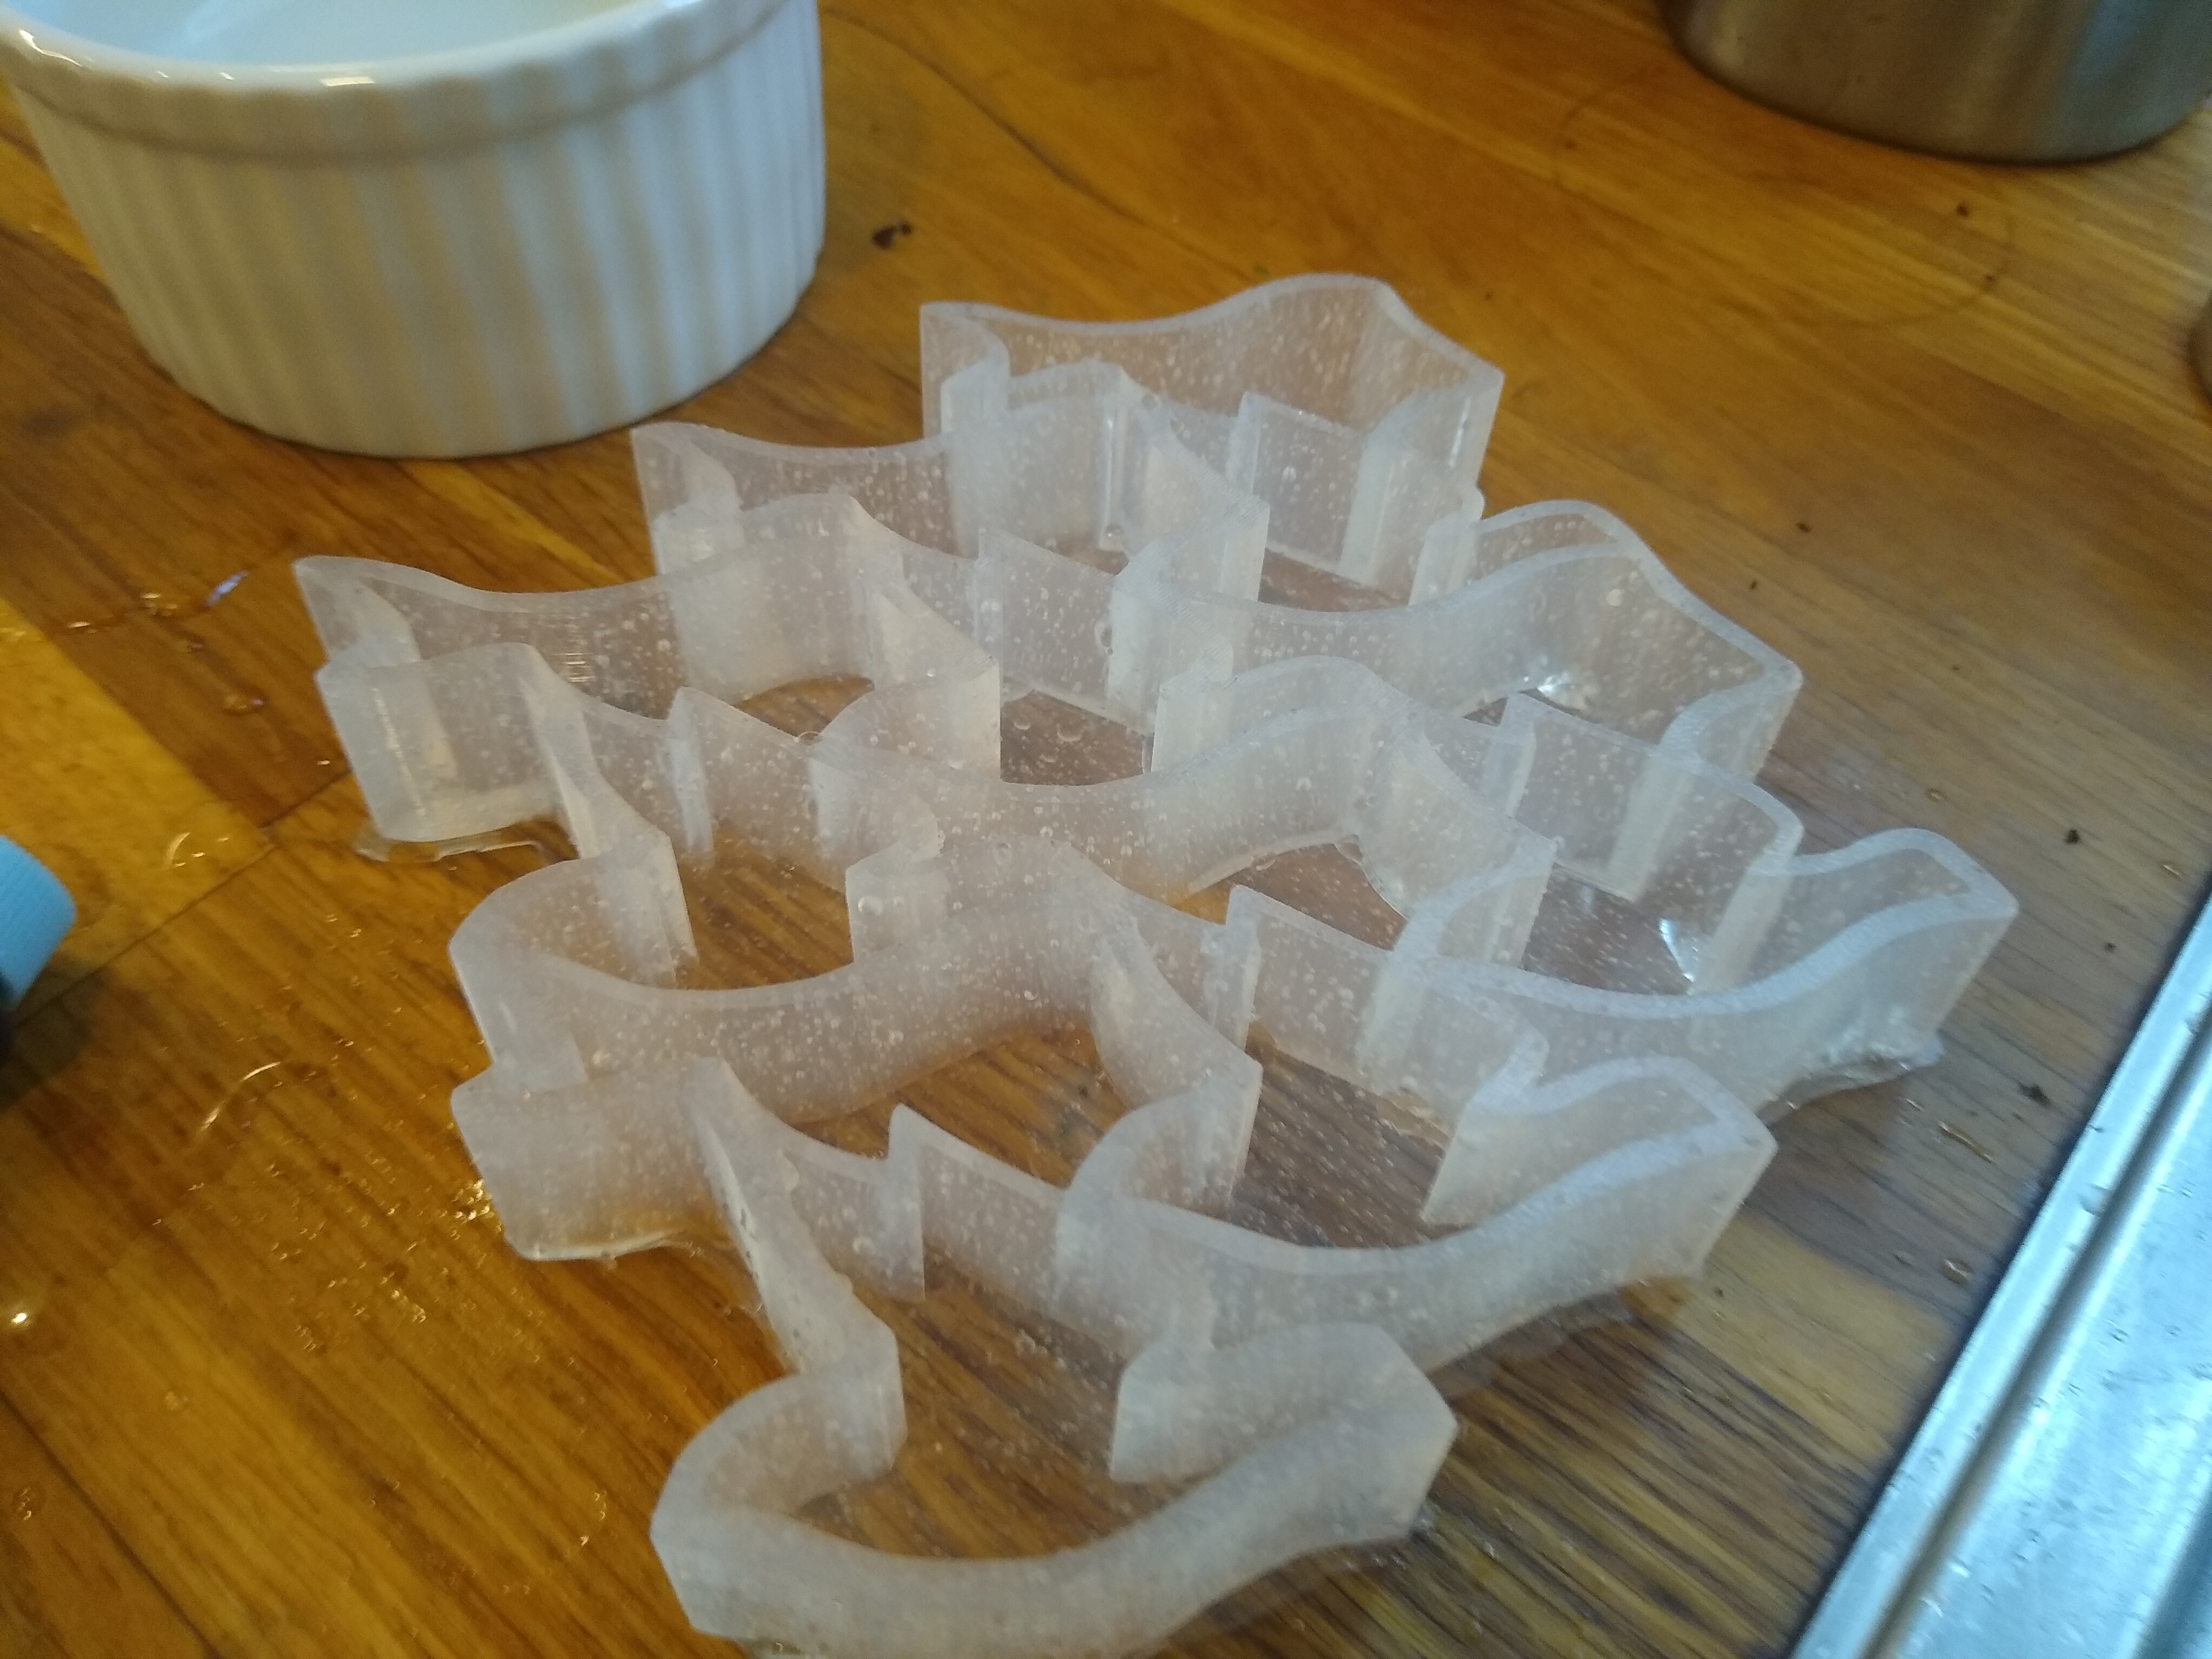
The result is a pretty good mold.
I only relied on time and the viscosity of the silicone to allow it to seep into the cracks and allow the larger air bubbles to rise to the surface.
There are some small air bubbles within the mold, but the walls are intact and well-separate the different ice voids.
Ideally, I would have a vacuum chamber for this step to further degass the silicone and remove the rest of the bubbles.
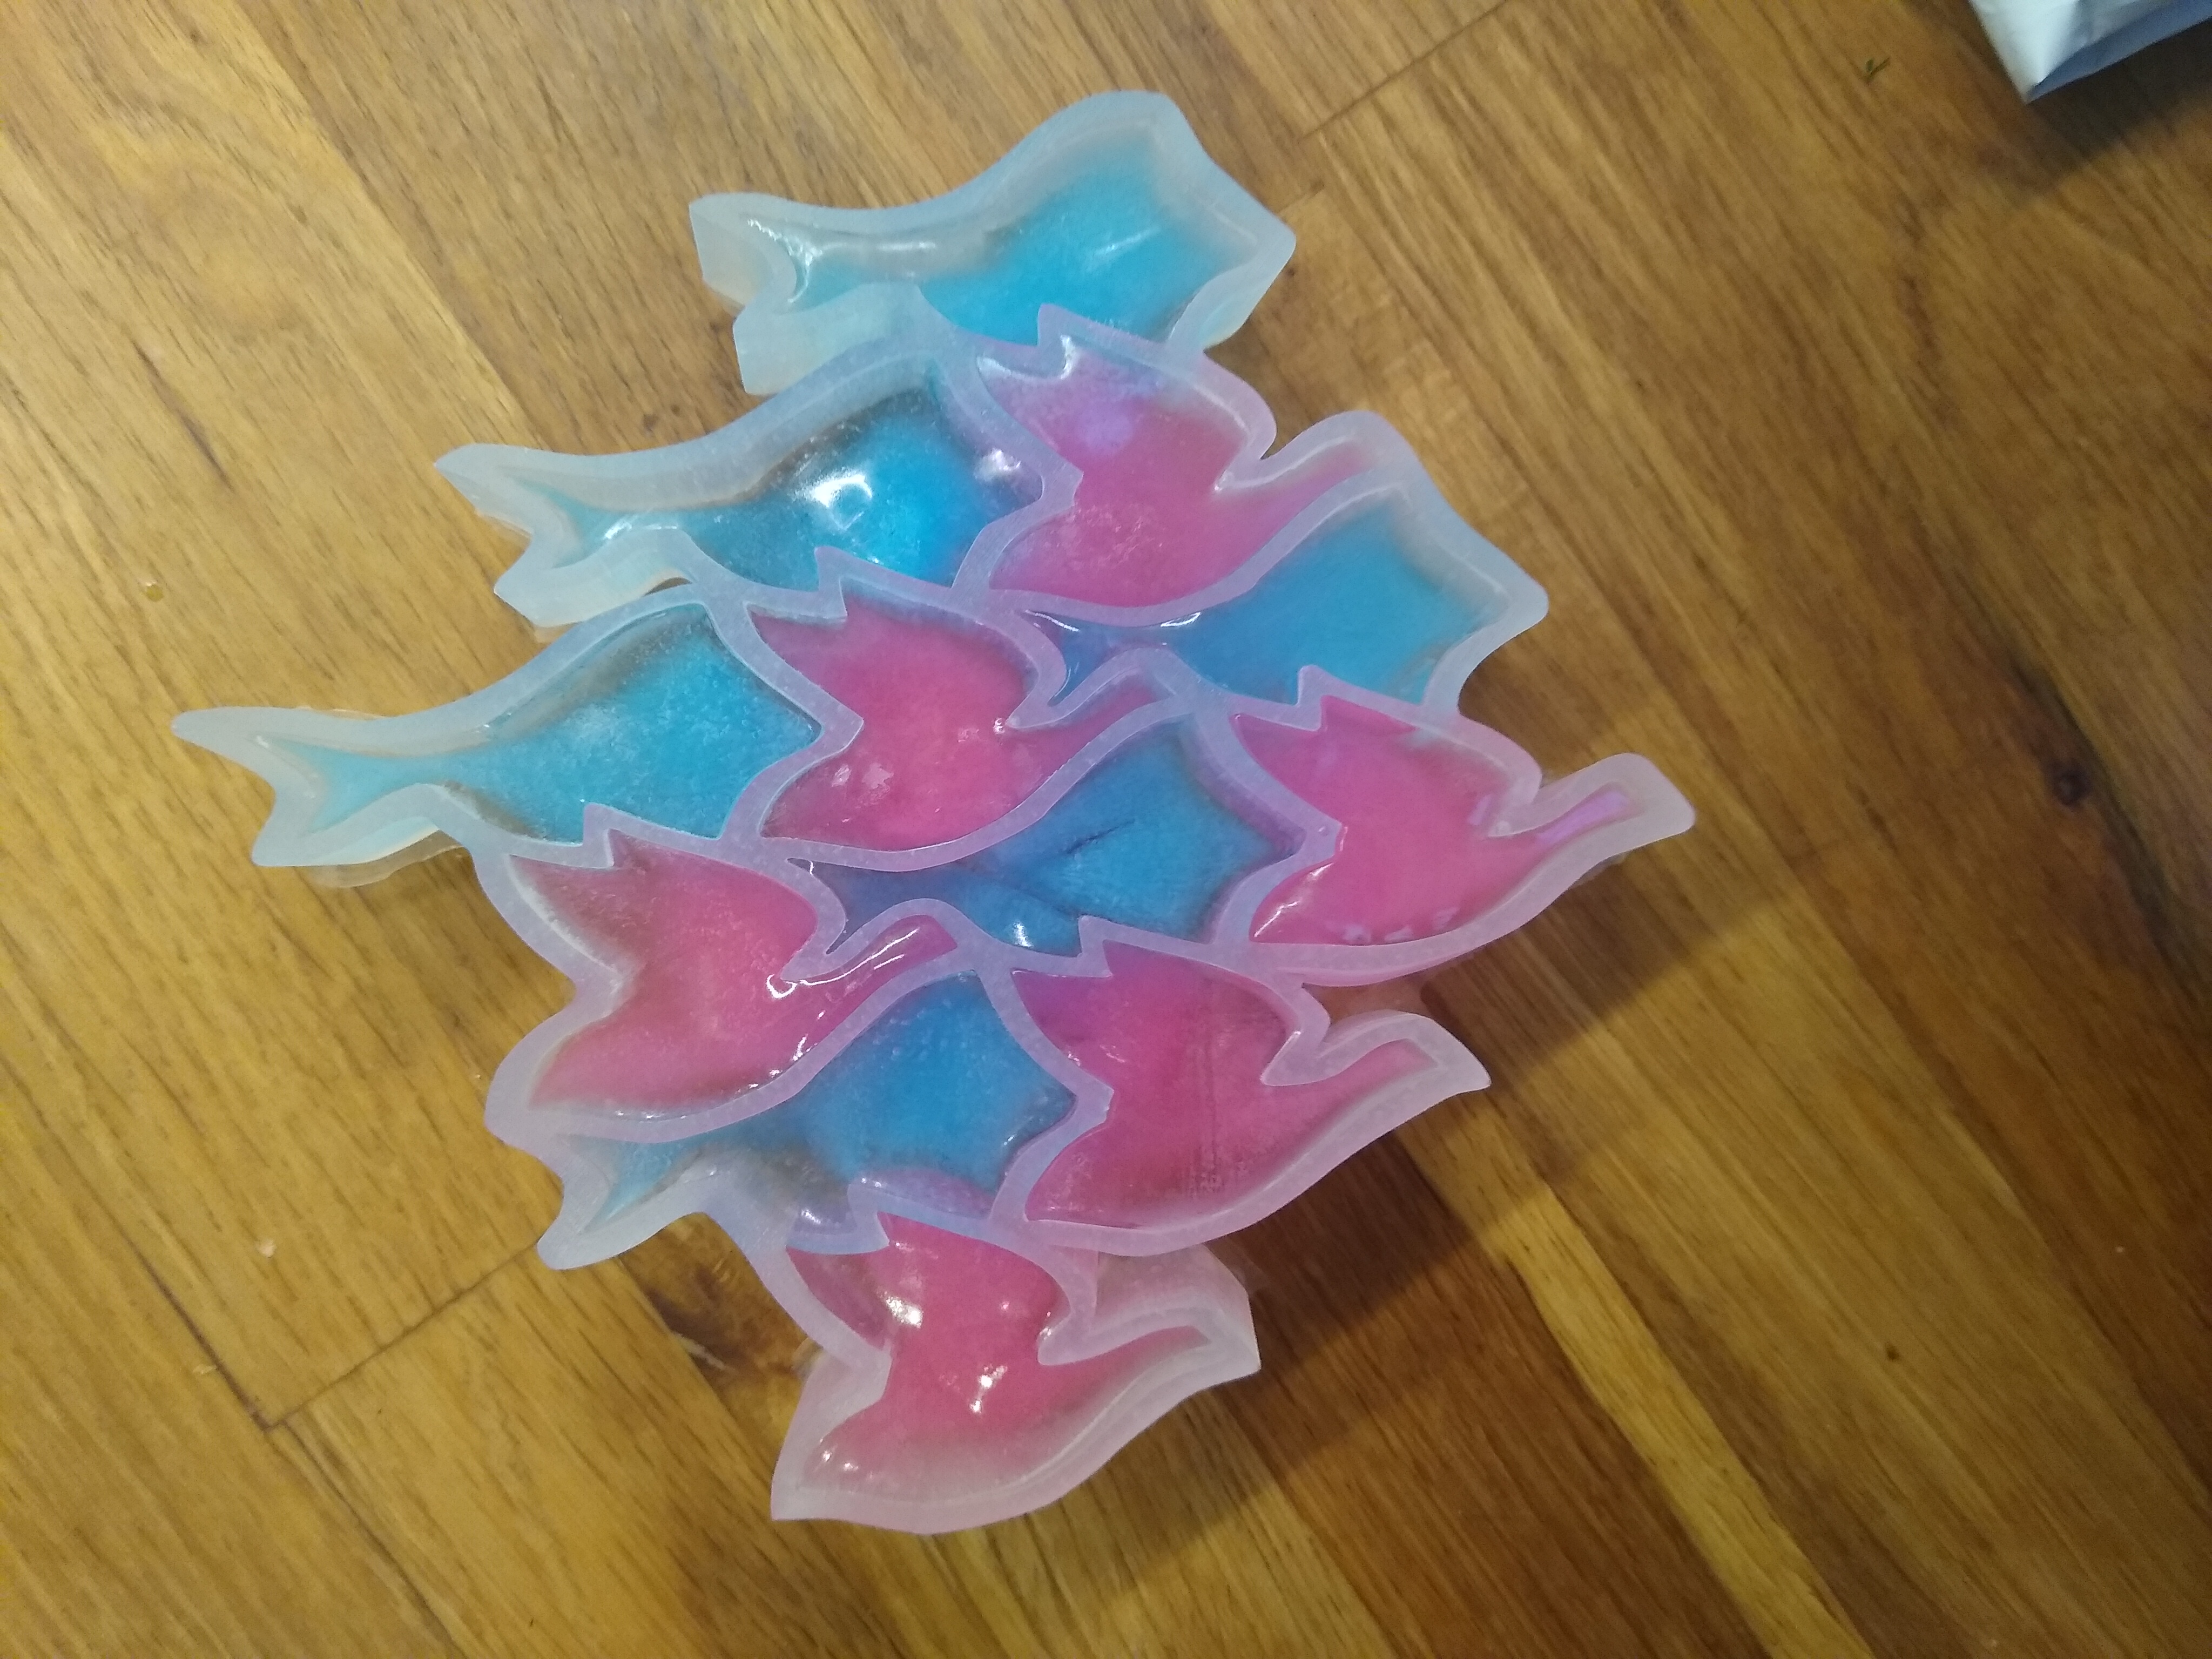
Putting some colored water into the mold makes for a really striking picture:
Next Steps
While writing this up kiddo pointed out that the mold has the birds facing the other direction - the opposite direction of the art!
Quite obvious in hind-sight as the mold is a negative of the 3D print.
Clearly I’ll have to do a left-right mirror and correct the ice cube tray to more closely match the art.
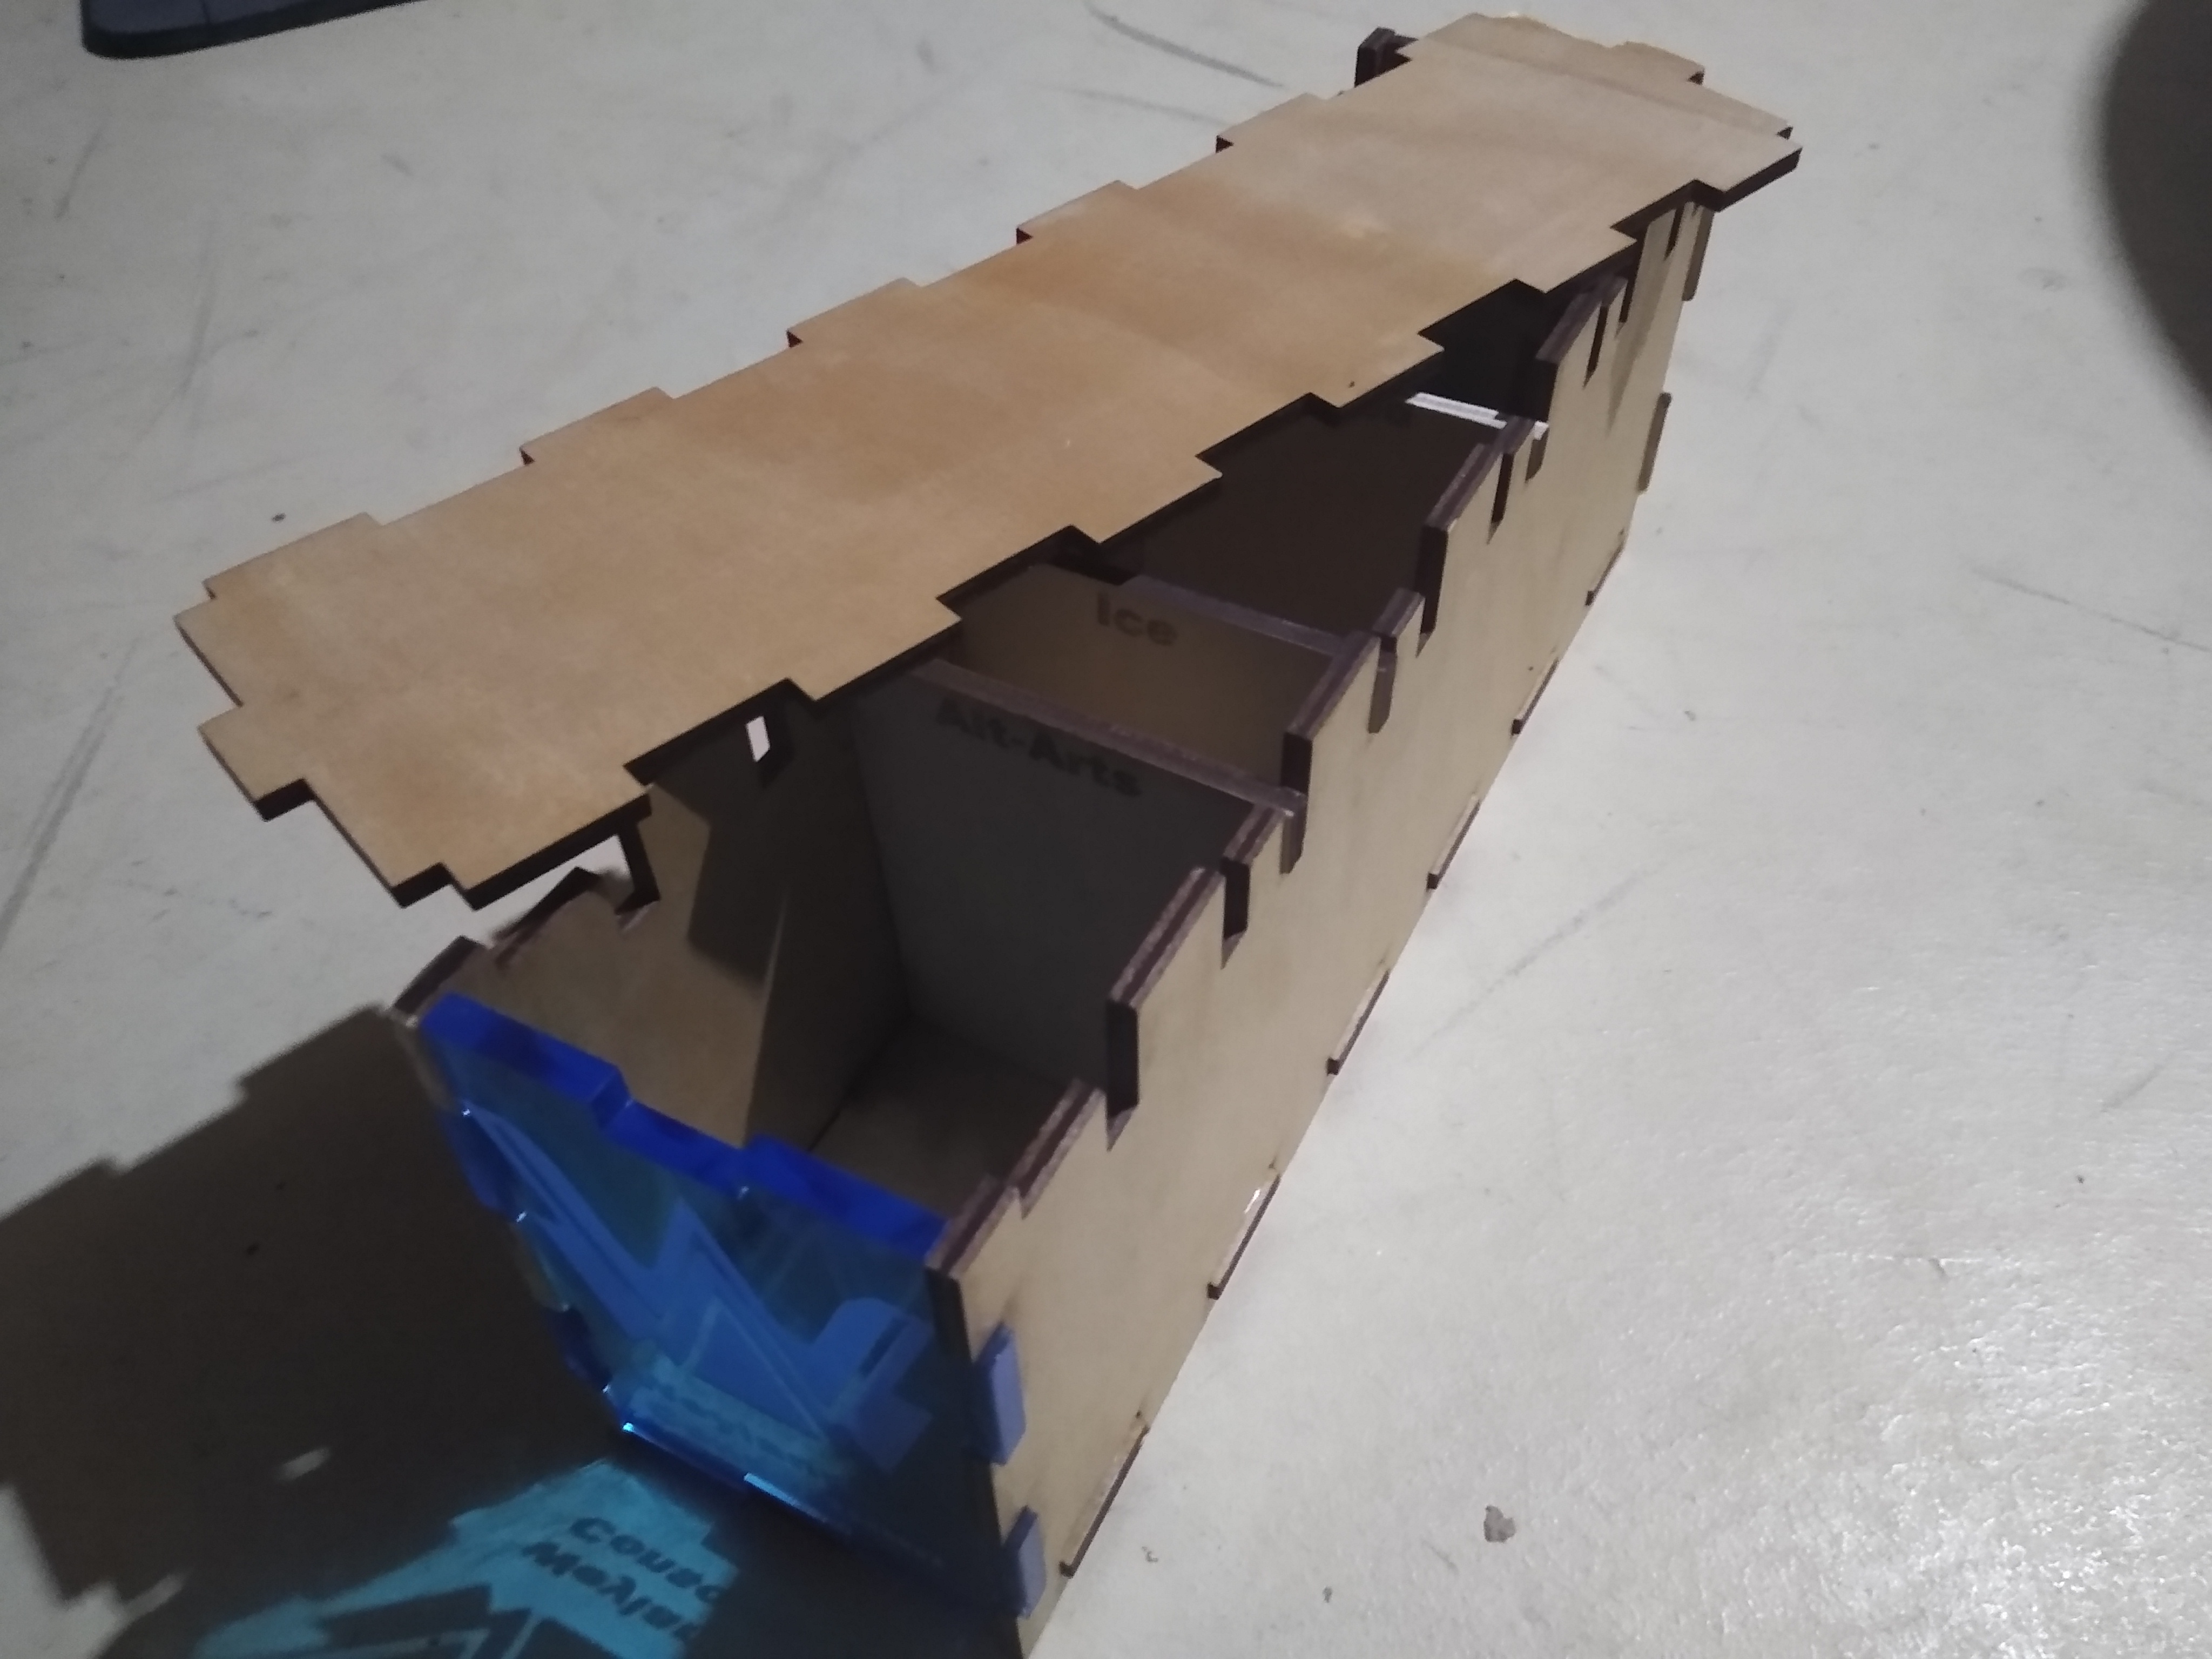
]]>K. E. ClaytorNetrunner Card Boxes2022-11-21T00:00:00+00:002022-11-21T00:00:00+00:00/2022/11/21/netrunner-boxesI’ve been wanting to upgrade my Netrunner card storage for a while.
Now that I have access to a laser cutter/engraver, I finally took the plunge and designed these boxes.
I think they turned out fantastic!
I future proofed so;
They’re deep enough to fit the entire FFG + Nisei card pool with room to expand (unsleeved)
They’re sized to fit dragon sleeves (I haven’t sleeved my collection yet, so I’m not sure if it works).
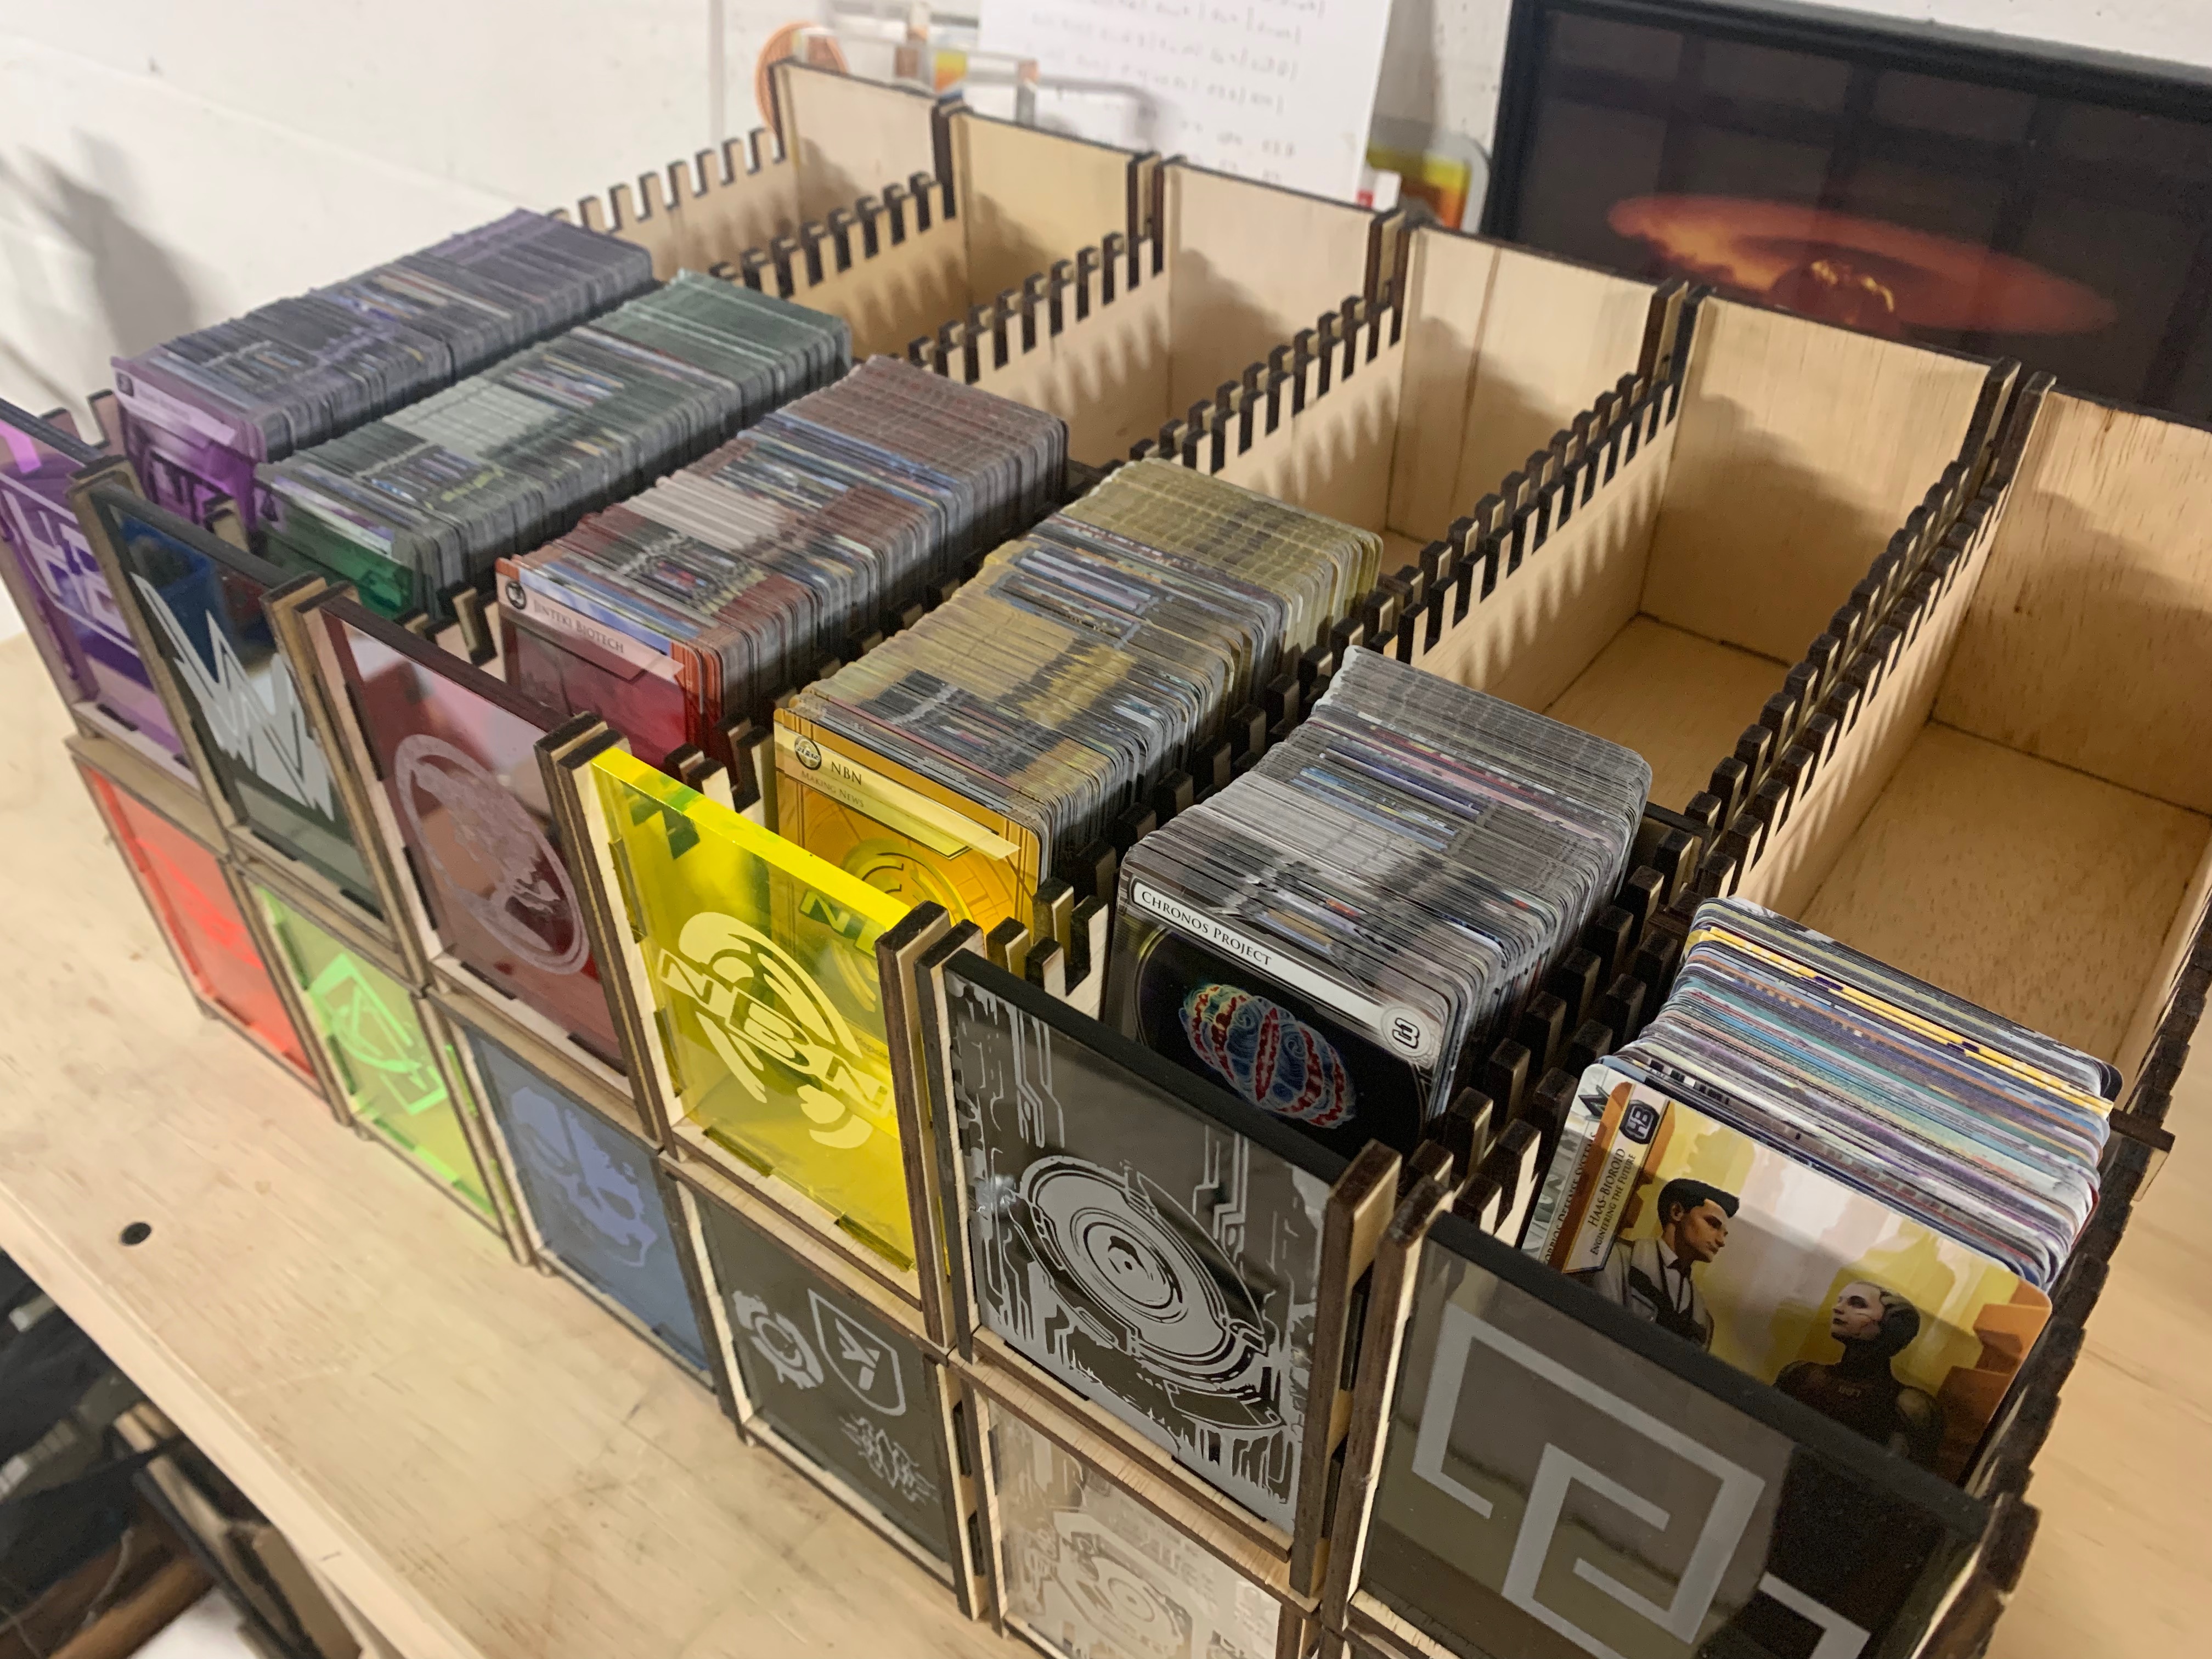
Between all of the factions, mini-factions, neutral, and alt-art boxes it is twelve boxes for a full set.
NOTE: The card separator inserts are a bit wide once the boxes have been glued together - you should either;
glue the boxes together with an insert in them to ensure the inserts fit, or
thin down the inserts a bit prior to laser cutting
NOTE: The hexagons are designed to have four shading levels (none, light, medium, dark).
You should run the shading test to determine which color levels you want to use and then adjust the groups in the boxes_v3_final accordingly.
To get the best effect, you may want to try different styles of plywood.
I found that “Lauan” plywood worked well for me.
Prototyping
Version 1
I knew what I wanted to do with the tab/slot construction and the first version largely shows that.
However, this build really highlighted three shortcomings;
I didn’t like the aesthetics of the full-acrylic front,
having the walls higher than the card height made it tough to extract cards,
the separator slots were too few and far between.
At this point, I also realized that;
I could have them stack since they have two “rails” on the bottom from the walls, and
The sides and top could really use some decoration.
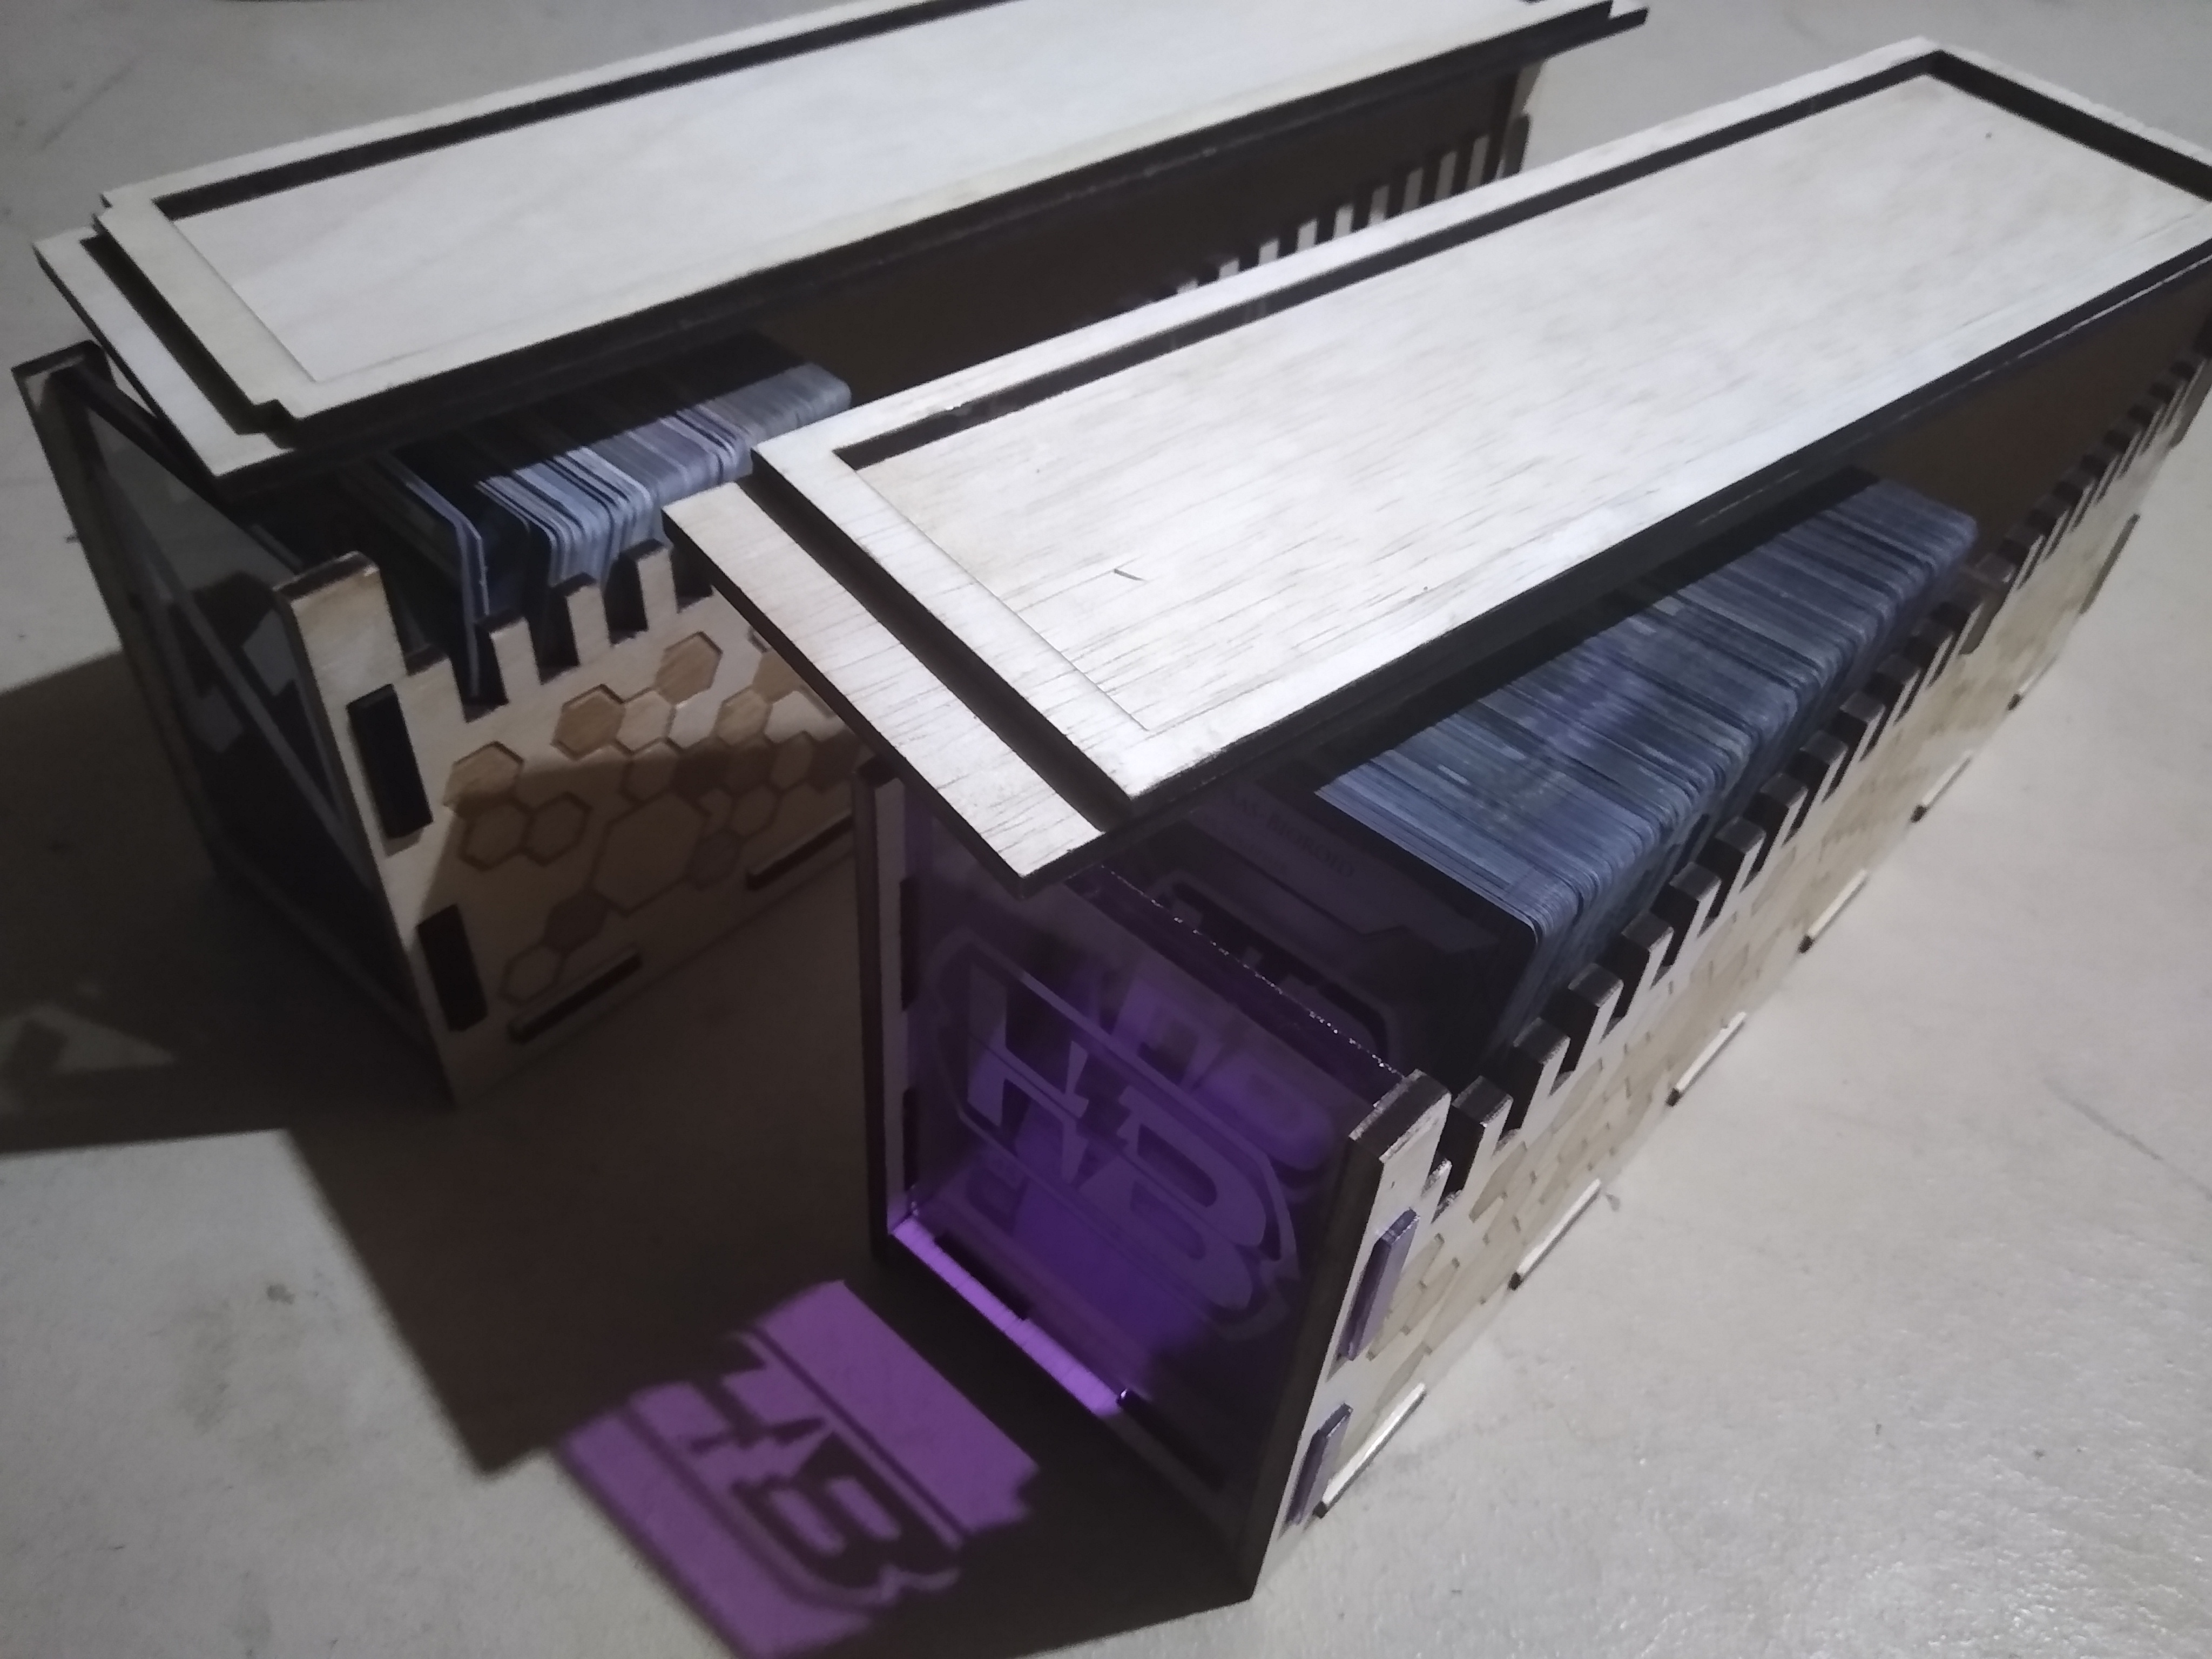
Version 2
Version two fixed most of these shortcomings and I was quite pleased with it.
The only major difference was the notches in the front of the lid were missing, which meant that it would slide back and forth.
Corrections on the version 2 box;
the lid had alignment notches in the back but not in the front (see the picture above), as a result;
the front would wiggle back and forth
you had to check which was the front/back of the lid before putting it on
who built it? I needed to to engrave my signature somewhere!
Version 3
Version three solved these and I went ahead with building all 12!
As mentioned above, I would still fix the insert width;
insert is a bit too wide, would reduce by 1/8 - 1/4th of an inch.
]]>K. E. ClaytorInstalling Ruby/Jekyll on MacOS 13 on M12022-11-11T00:00:00+00:002022-11-11T00:00:00+00:00/2022/11/11/jekyll-serve-mac-13Some notes on updating ruby-on-rails on my M1 Mac Air running OSX 13:
Once that worked, the rest proceeded smoothly until it came time to serve the site.
I needed to add two additional gems (the install instructions only mention the first)
bundle add webrick
bundle add rexml
You may need bundle update and bundle install
Then jekyll serve worked; bundle exec jekyll serve --livereload
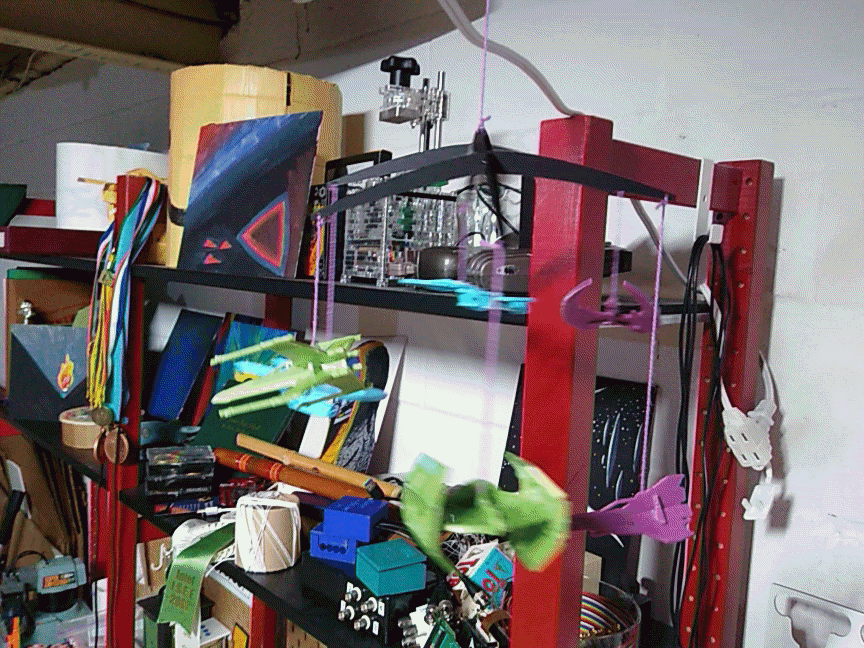
]]>K. E. ClaytorSci-Fi Mobile2022-10-22T00:00:00+00:002022-10-22T00:00:00+00:00/2022/10/22/sci-fi-mobileI recently took training for the 3D printers at my makerspace.
As a first project I found these neat “kit-cards” on Thingiverse, a great resource for 3D print ideas.
These reminded me of the model airplane kits I used to build as a kid and the hours of fun I had there.
After printing them out and assembling them with kiddo, I thought they would look good in a mobile.
So I put together a quick laser-cut arc template and assembled them into a mobile.
They were also great test pieces for the 3D printer.
Using these I was able to test the different (raft/brim) adhesion options, adhesion material (I preferred the PLA, as it snapped off cleanly and could be soaked in water to remove the rest), and fill percentage.
The arc lengths on the mobile are all the same length, so I had to balance it to the models’ weights.
Here’s the weight balancing diagram:
            Cylon = 6g      Viper = 5g
EnterpriseD = 8g                Tie Fighter = 11g
        Enterprise A = 3g   XWing = 5g
]]>K. E. ClaytorYAY Tracker2020-09-12T00:00:00+00:002020-09-12T00:00:00+00:00/2020/09/12/yaytrackerSo I’ve been mostly enjoying pandemic work-from-home.
The one thing I don’t like though is the easy access to snacks.
So to try to reduce my snacking consumption, I thought I would try to replace the instant gratification of a snack with something else.
Thus was born the “YAY Tracker” - instead of going for a snack, I can click “YAY” (A button) and get some motivational support!
If I can’t refuse temptation and end up getting the snack, I can click the “NAY” (C button) and get some support for next time.
The total counts of “YAY”s (snack avoided) and “NAY”S (whoops snacked) are logged throughout the day and can be accessed (B button).
Solider on some short headers or stacking headers to the feather, snap on the LCD featherwing, sandwiching in the battery, upload the code, and you’re good to go.
There’s nothing too fancy about it - pull a random message from a list, increment a counter, keep track of display levels.
Regarding the dispaly, the Adafruit displayio has an excellent tutorial.
Conclusion
This was a fun introduction to the adafruit drawing library, but ultimately it did not help me in my snacking goals.
Some improvements would be longer battery life to where it could go the whole day on a charge, and storage of the yay/nay counts so they don’t reset when power is lost.
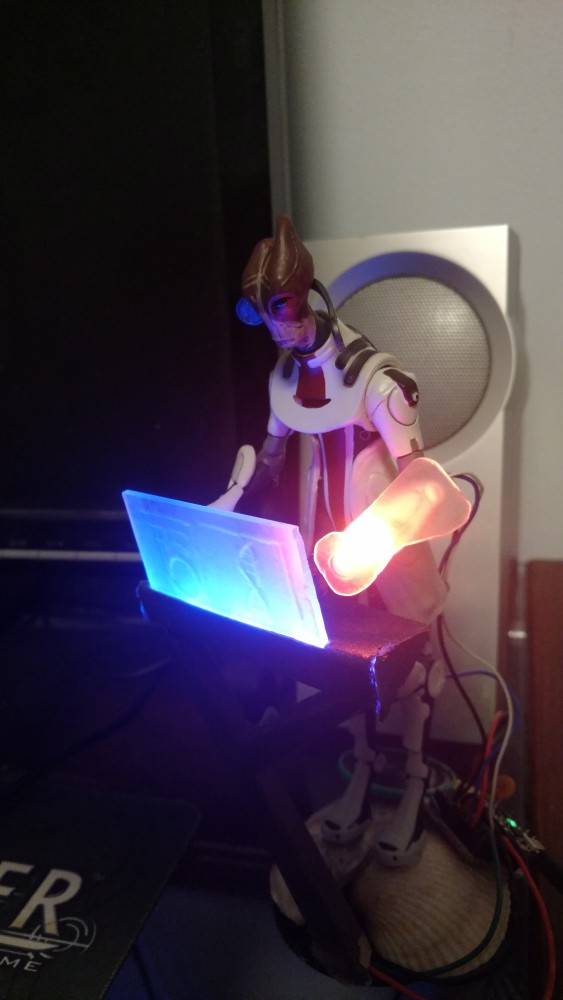
]]>K. E. ClaytorMordin Solus2020-04-29T00:00:00+00:002020-04-29T00:00:00+00:00/2020/04/29/mordinKiddo found an old Mordin Solus (Mass Effect) action figure I had and wanted to know when it would light up again.
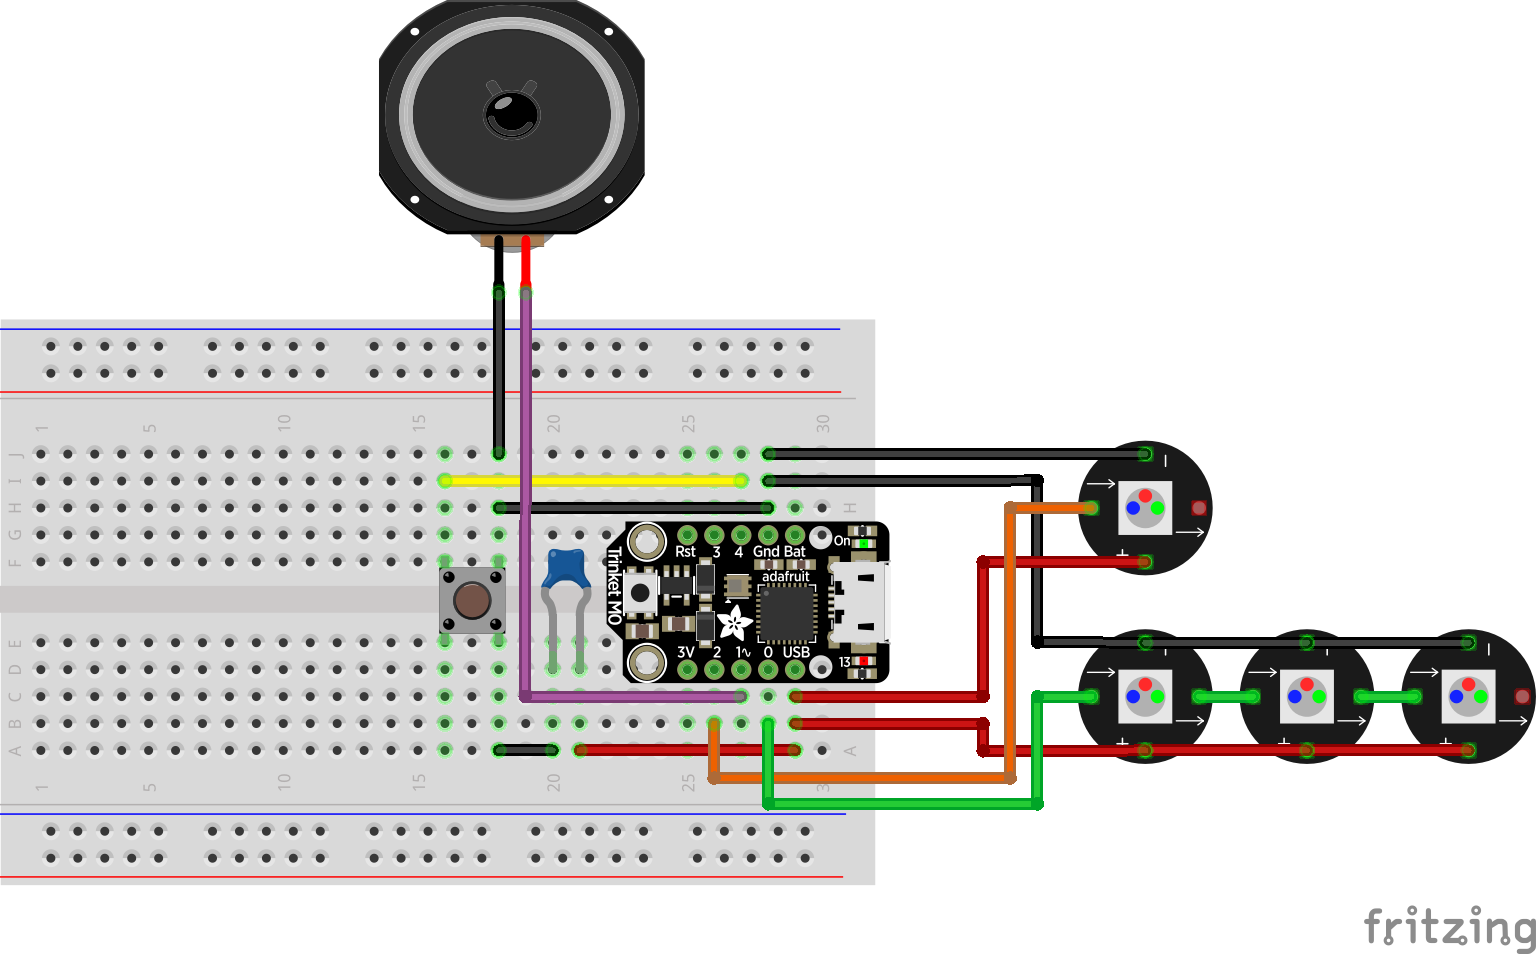
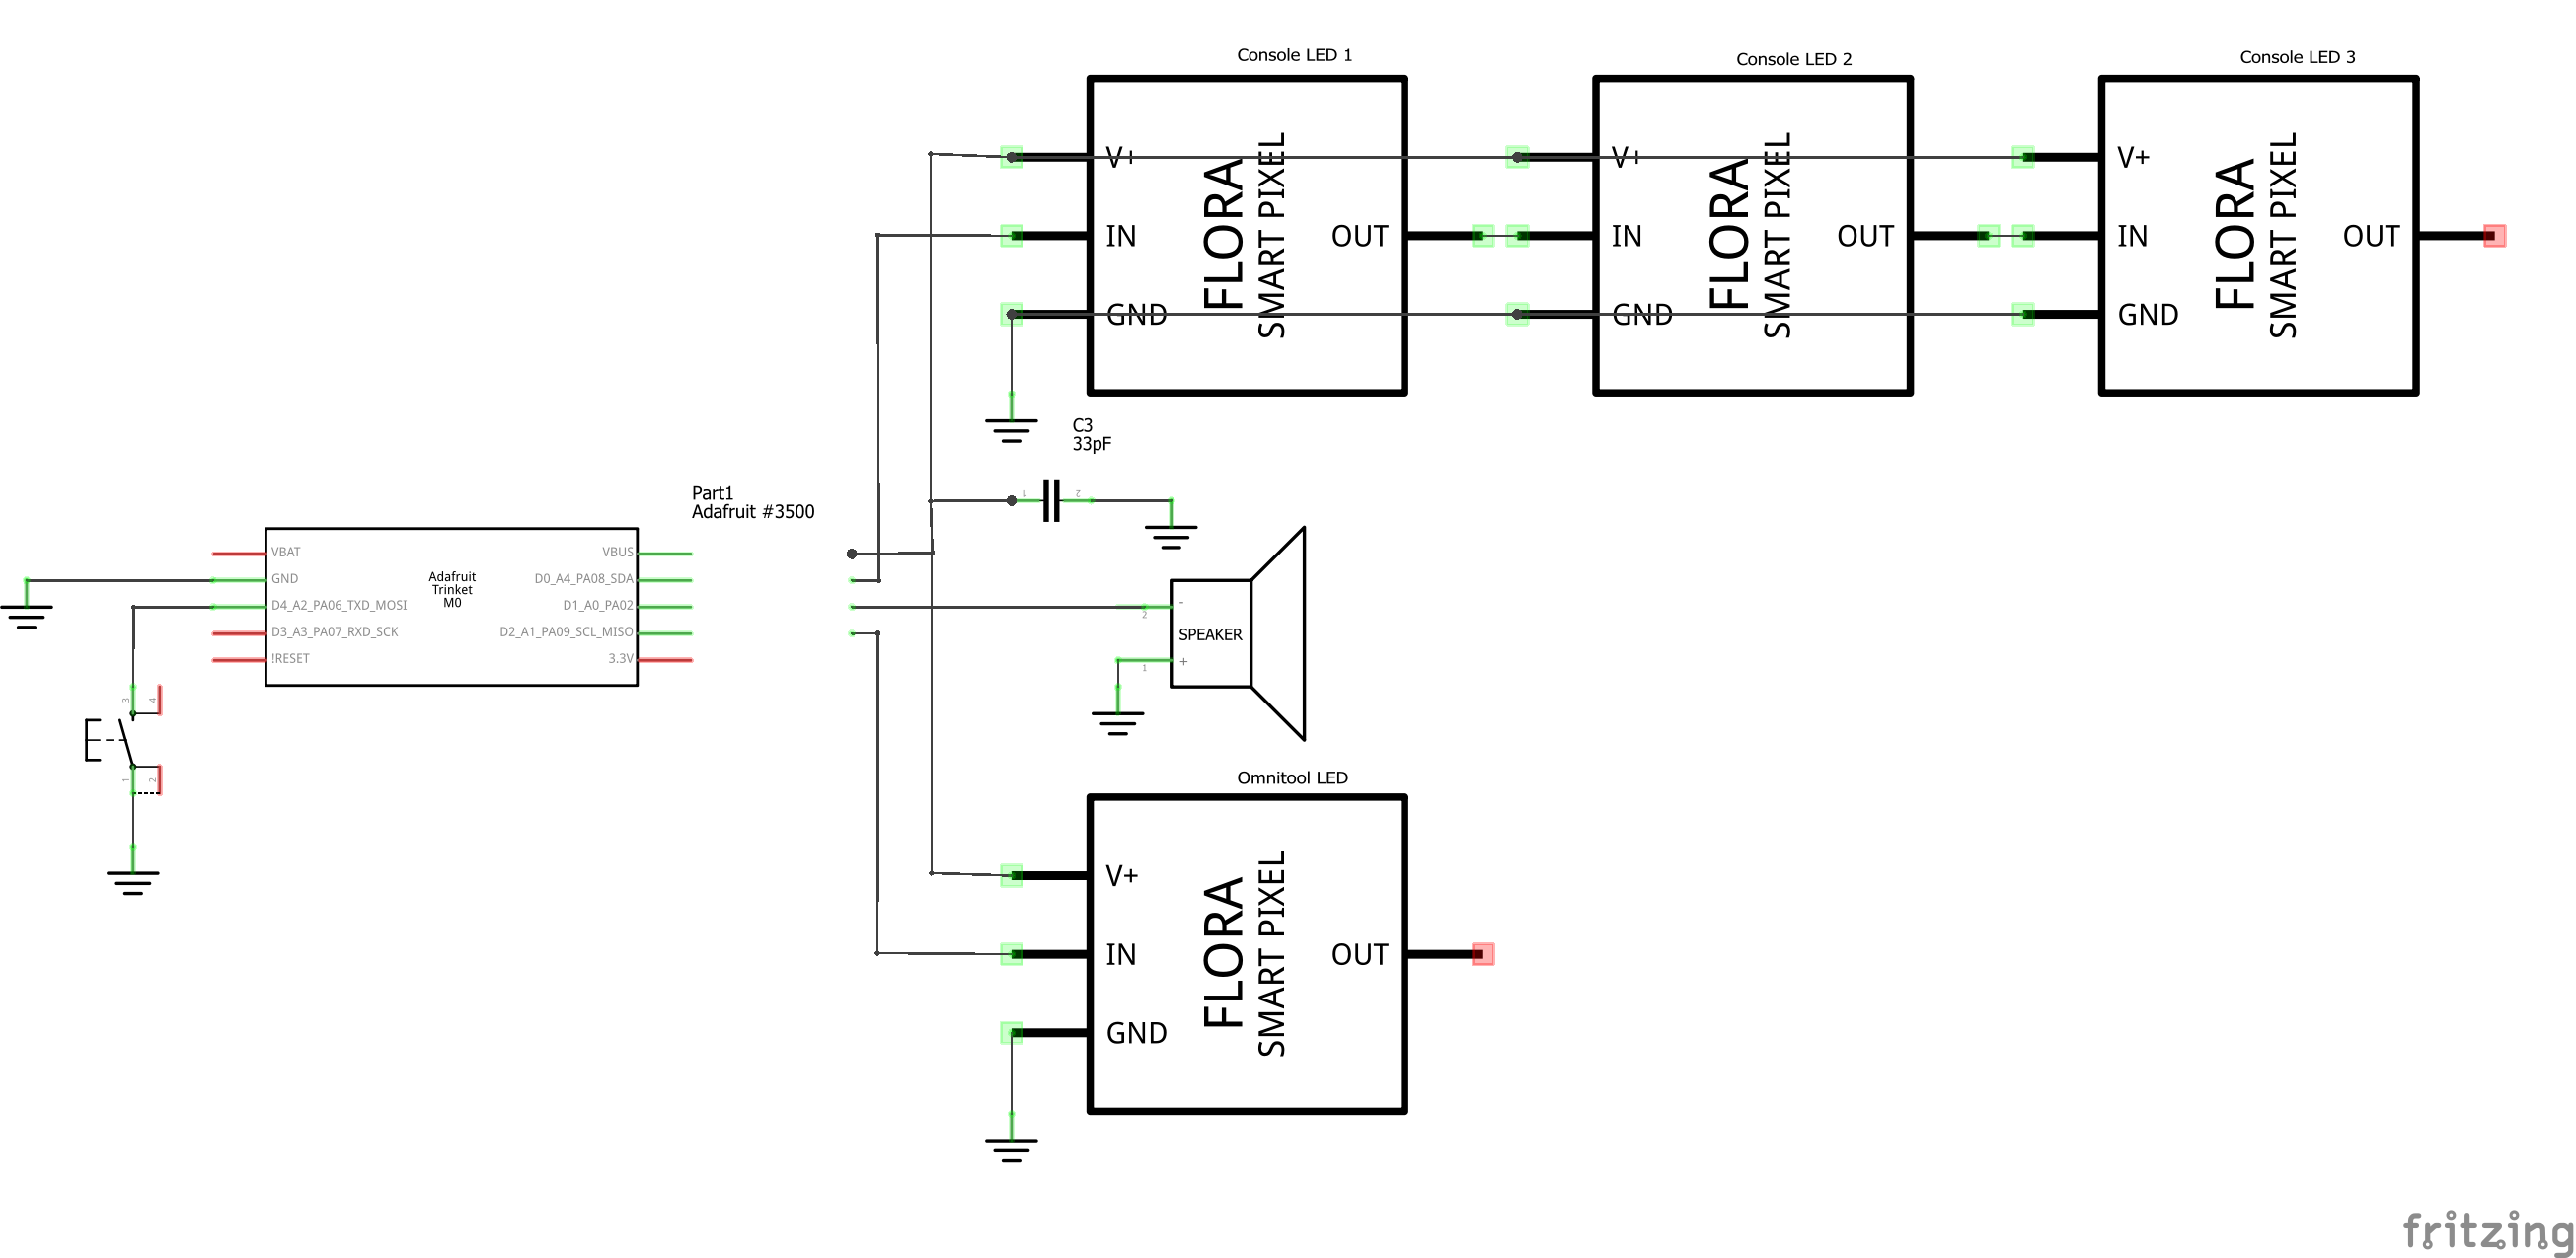
So we added four RGB LEDs, a speaker, and a button and turned it into a ambient light and pomodoro timer.
The full source is on Github, I re-used the button code from the multipad project, but the neat part is the trinary counter system.
Since there’s only one button, you can set the timer by pressing the button multiple times.
I toyed around with a number of ways of indicating the amount of time set.
For example, I would increase the light intensity with every click, but this was not as clear as I would have liked.
I also tried a binary on/off counter for the lights, but that couldn’t count high enough, and didn’t look good with the console lights turning off.
In Mass Effect, there are three colors as a major palette - orange (ambient / consoles), red (renegade), and blue (paragon).
So I adopted a trinary counter where there are three options for each bit (0, 1, or 2).
Orange would represent zero, red one, and blue two.
This provided clear distinctions as you increase time with clicks, and the colors blended nicely as the timer counts down.
Let’s see how to convert between decimal and trinary.
In binary, you multiply the bit value (0 or 1) by 2 raised to the bit index.
So 1 in decimal is 001 in binary; 0*2^2 + 0*2^1 + 1*2^0 = 0 + 0 + 1 = 1.
5 in decimal is 101 in binary; 1*2^2 + 0*2^1 + 1*2^0 = 4 + 0 + 1 = 5.
You can also think of this as the power of two’s place; [4’s place, 2’s place, 1’s place].
In trinary, you do the same thing; multiply the bit value (0, 1, or 2) by 3 raised to the bit index.
So 1 in decimal is still 01 in trinary; 0*3^1 + 1*3^0 = 0 + 1 = 1.
5 in decimal is now 12 in trinary; 1*3^1 + 2*3^0 = 3 + 2 = 5.
You can also think of this as the power of three’s place; [9’s place, 3’s place, 1’s place].
The smaller bit representation in trinary also allows us to reach higher values with the same number of bits.
Here’s the code that converts a decimal to a trinary list:
defdecimal_to_ternary(d,t_len=3):""" Convert a decimal to a ternary key.
"""t=[0]*t_lenforpinrange(t_len,0,-1):# print(d, p, 3**(p-1), d // (3**(p-1)) )
tp=d//3**(p-1)t[p-1]=tpd-=tp*3**(p-1)returnt
and one that goes the other way from ternary to decimal:
defternary_to_decimal(t):""" Convert a ternary key to a decimal.
"""d=0forp,kinenumerate(t):# print(t, k, p, (3**p) * k)
d+=(3**p)*kreturnd
Here’s some output so you can visualize the conversion better;
Everything’s soldered into a perma-proto with some headers.
This allows me to unplug components as needed - which I had to do, as I had to re-solder the console LEDs.
Also, I may change the functionality in the future and wanted to make that easy.
Conclusion
It felt good to get this project off the list.
I’d like to eventually work out some USB serial communications, so I can push notifications to Mordin from the PC, but right now I don’t have a very good use case for that.
So I’m happy enough to have him just changing light colors on the desk and available as a timer when needed.
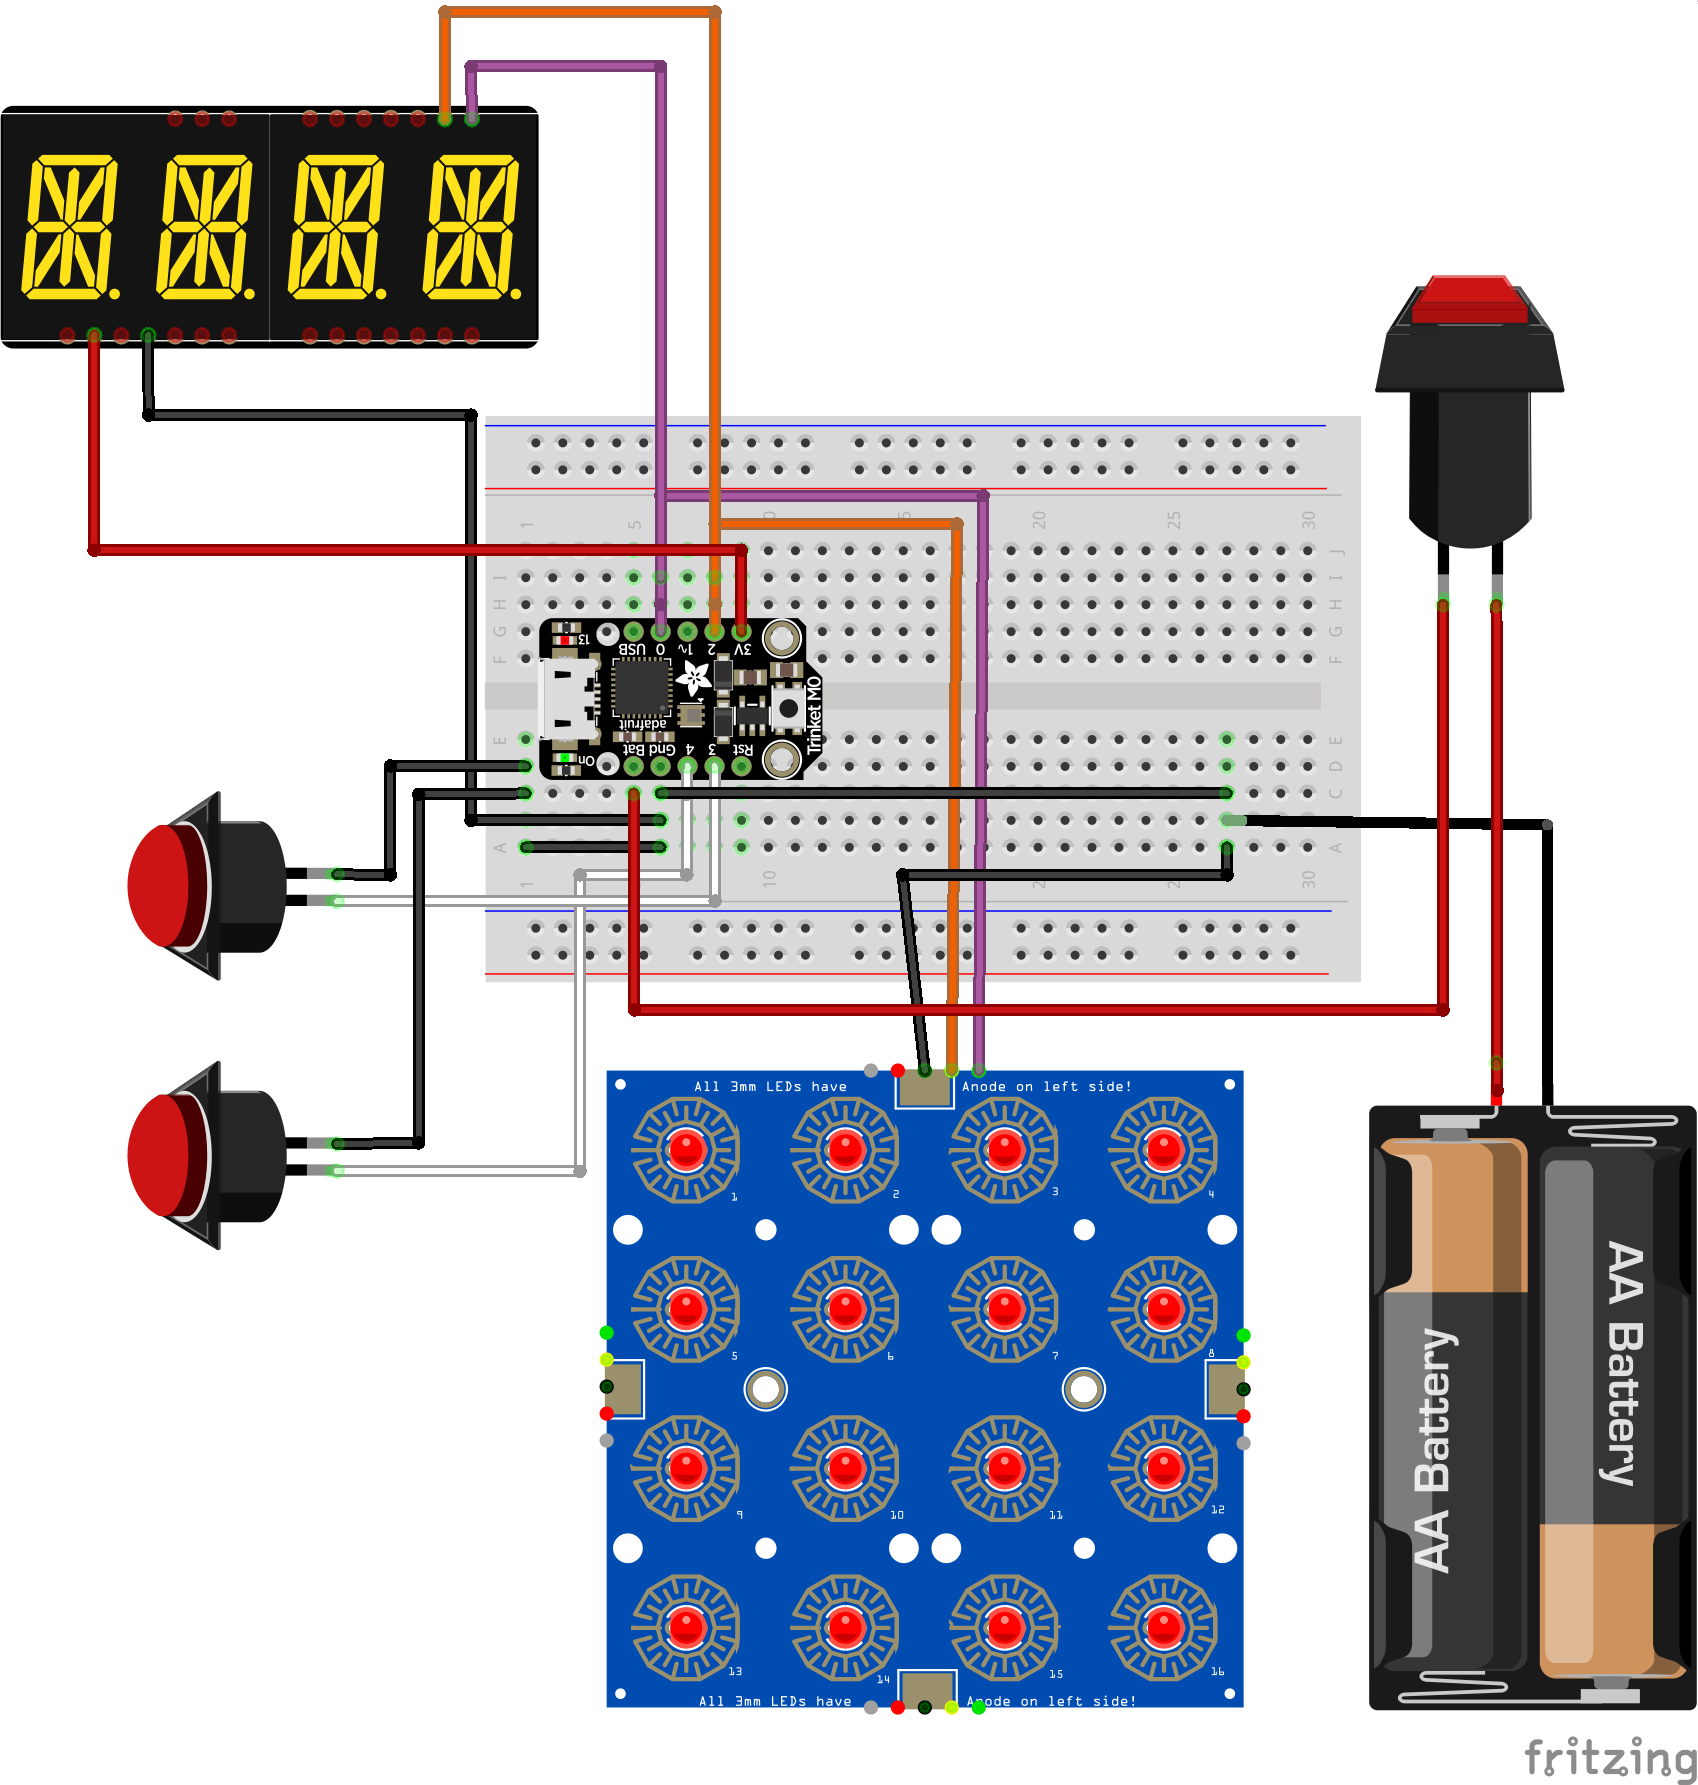
]]>K. E. ClaytorMulti-Function-Button-Pad2020-02-15T00:00:00+00:002020-02-15T00:00:00+00:00/2020/02/15/multi-padWhen Josie and I saw the Trellis - an illuminated button pad - we just knew we needed to invent a project so we could get one.
This project is pretty simple hardware-wise, but flexible enough that it can be programmed with plenty of neat functions.
For example, you could label the buttons and turn it into a simple calculator. My audience is just learning addition and subtraction, so we made a couple of simple math games and a puzzle game.
1x latching pushbutton (needed if battery holder doesn’t have a switch)
Female headers (optional)
The non-electronics parts consist of:
Cardboard box
Wiring
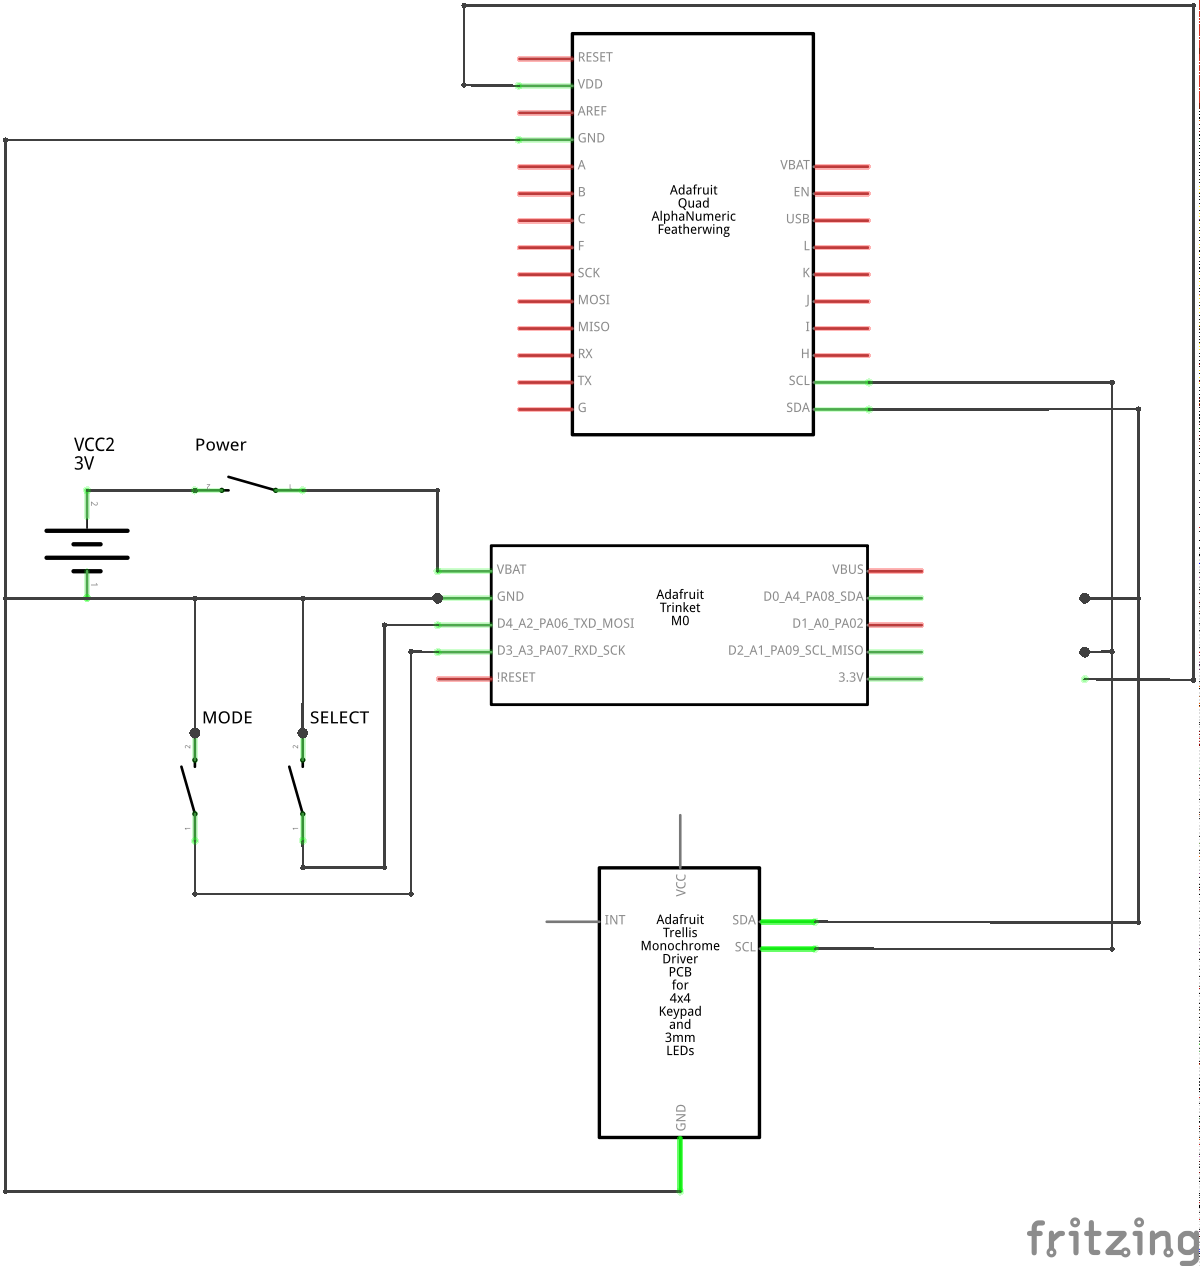
I’ll introduce the full circuit diagram and then break it down.
The wiring schematic is quite busy, but very straightforward.
connect everything to grouknd.
the Trellis and 14-segment display need I2C SDA and SCL
mode and select go to D3 and D4
power comes in through the power switch to Vbatt.
One issue that I ran into was the power for the Trellis. When running off of USB, use USB power (V_usb) but when running off of batteries, the 3.4 V 2xAA cannot supply the V_usb pin correctly, so instead use the V_batt pin.
Here’s the schematic:
And the circuit diagram:
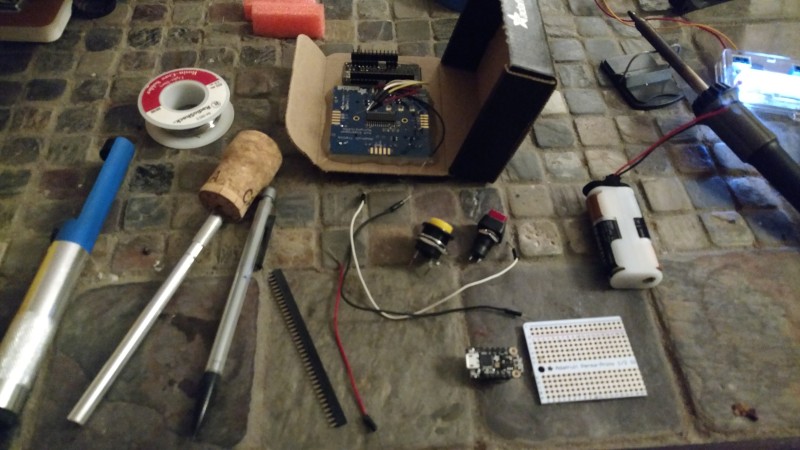
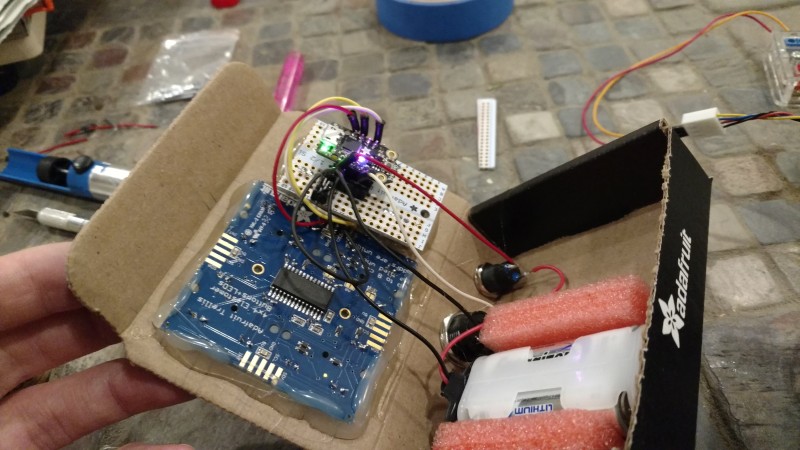
As always, prototype on a protoboard before transferring to the perma-proto.
Soldering together the perma-proto was a bit of an exercise in trying to not overlap pins.
I ended up soldering the display headers to one side, and the rest (Trinket, button, power) headers to the other.
Thankfully, most of the pins on the 14-segment display are not connected - only the power and I2C pins are used.
Hence, the Trinket M0 can fit between these and power can be pulled out.
Also, the perma-proto was a tad to big to fit in the cardboard with the Trellis, so I sawed off the end and both sides.
Here’s the fully wired interior:
Code
The full source is on Github, but I’ll pull out a few snippets here to discuss design choices.
The code can be split into;
1) logic to switch between modes and
2) the logic for each mode.
For the buttons, I use a helper class that provides some useful button functions.
Instead of just “is the button pressed?” it also has functions to answer “was the button just pressed” and “was the button just released”.
The bulk of the button logic is done in the update function, which checks the current state and compares it to the previous state. This function needs to be called before the “check” functions (.pressed(), just_pressed(), and just_released()):
classButton():""" Button convenience class.
Create a button:
>>> button = Button(board.D3, digitalio.Pull.UP)
Update the button state:
>>> button.update()
And then check for conditions:
>>> if button.pressed():
>>> ...
>>> if button.just_pressed():
>>> ...
>>> if button.just_released():
>>> ...
"""...defupdate(self):""" Read the current button state and update internal state.
"""# Update the last state
self.last_state=self.state# Read the current state
ifself.mode==digitalio.Pull.DOWN:self.state=self.button.valueelifself.mode==digitalio.Pull.UP:self.state=notself.button.value# Update the pressed / released states
self.edge_up=self.stateandnotself.last_stateself.edge_down=notself.stateandself.last_state
With this helper class, we can do some interesting ways of changing the mode.
To prevent accidental mode changes, we can require that the mode button be held down, and then the select button pressed.
Then when the desired mode is selected, releasing the mode button will create a new “game” in that mode.
Alternative we can create a new game by pressing (and releasing) the select button.
In retrospect, kiddo had some difficultly holding down the mode button to select a game, so I removed that function, and instead when the mode button is released, it increments the mode.
To simplify the game logic, we just use a switch, and keep most of the variables needed for the game modes as global variables:
# Main logic
ifMODE==FREE:logic_free()elifMODE==GAME:logic_game()elifMODE==ADD:logic_add()elifMODE==SUB:logic_sub()
Now onto the fun part - the particular modes:
Free play
Freeplay is the easiest mode - initialize to an empty grid and toggle the button when pressed.
definit_free():trellis.led.fill(False)deflogic_free():""" Free play
Trellis button press changes LED state.
"""just_pressed,released=trellis.read_buttons()forbinjust_pressed:trellis.led[b]=nottrellis.led[b]
Game mode
In game mode, a button press changes not only that button, but the neighboring buttons.
The goal is to go from a mixed-board state to a full-on or full-off state.
We just have to watch for the edge cases - literally.
If the button pressed is near the edge, we don’t want to overflow and switch states on another row.
So for this case, we convert the button index to (i, j) coordinates and do not switch elements beyond the bounds of the grid.
defgame_button_press(b):""" Invert button b and neighbors.
"""print("game button: ",b)# Convert button index to row and column
i=b//4j=b%4# Get coordinates of button and neighbors
px=[(i,j),(i-1,j),(i+1,j),(i,j-1),(i,j+1)]for(i,j)inpx:if(0<=i)and(i<4)and(0<=j)and(j<4):idx=(i*4)+jtrellis.led[idx]=nottrellis.led[idx]
The fun bit is to initialize - start with a full grid, and then randomly push buttons a random number of times.
definit_game():""" Create a new random game board.
"press" a random button between 8-12 times
"""trellis.led.fill(True)forpressinrange(random.randint(8,13)):b=random.randint(0,16)game_button_press(b)display.print(press)time.sleep(0.2)
The button logic is virtually the same as the free play mode, but we replace the toggle with our new game_button_press function.
deflogic_game():""" Game play
Trellis button press inverts button and neighbors.
"""just_pressed,released=trellis.read_buttons()forbinjust_pressed:game_button_press(b)
Addition game
Another mode is an addition game, where we display an addition problem and you have to illuminate the correct number of buttons.
A variant would be numbering the buttons and have to press the result.
definit_add():""" Create a new addition problem
Choose a + b = c such that a, b < 10, and c <= 16
These conditions ensure that "a+b=" is pritable, and reachable
"""globaladdition_goaltrellis.led.fill(False)a=random.randint(1,9)b=random.randint(1,16-a)ifb>9:b=9c=a+bdisplay.print("{a:d}+{b:d}=".format(a=a,b=b))print(a,b,c)addition_goal=c
Our initialization function is now a bit more complicated.
We pick two numbers that sum to 16, the first we can specify that a is between 1 and 9 (inclusive).
The second could exceed 9 (eg; 16 - 1), so we cap our second integer at 9.
Note that we use the global variable addition_goal so we can reference it in our logic_add function.
defget_active():""" Return an array of pressed buttons.
"""return[iiforiiinrange(16)iftrellis.led[ii]]deflogic_add():""" Game play
Toggle buttons and see if we "win".
"""globaladdition_goaljust_pressed,released=trellis.read_buttons()forbinjust_pressed:trellis.led[b]=nottrellis.led[b]active=get_active()print(len(active),addition_goal)iflen(active)==addition_goal:display.print(" ={c:2d}".format(c=addition_goal))forbinrange(16):trellis.led[b]=nottrellis.led[b]
We want a bit of a visual “bang” when we reach the correct number, so we invert the keypad colors when the correct answer is reached.
This actually turned into a really neat result;
it let’s you toggle lights back to the solution again,
when the correct answer is 8 (half of the display) - the display starts to alternate between modes.
Subtraction game
The subtraction game is similar to the addition game, we just have to specify the initial conditions somewhat differently;
definit_sub():""" Create a new subtraction problem
Choose a - b = c such that a > 1, b > 0, and c > 0
"""globalsubtraction_goaltrellis.led.fill(False)a=random.randint(1,9)b=random.randint(0,a)c=a-bdisplay.print("{a:d}-{b:d}=".format(a=a,b=b))print(a,b,c)subtraction_goal=c
Minimizing code
At the end of implementing all of these game functions, I started to get some warnings that there were issues in importing modules.
Of course the microcontroller has limited memory and at some point we start running into that limit.
As a result, I had to trim out some excess code - print statements, un-needed branches, etc.
Assembly
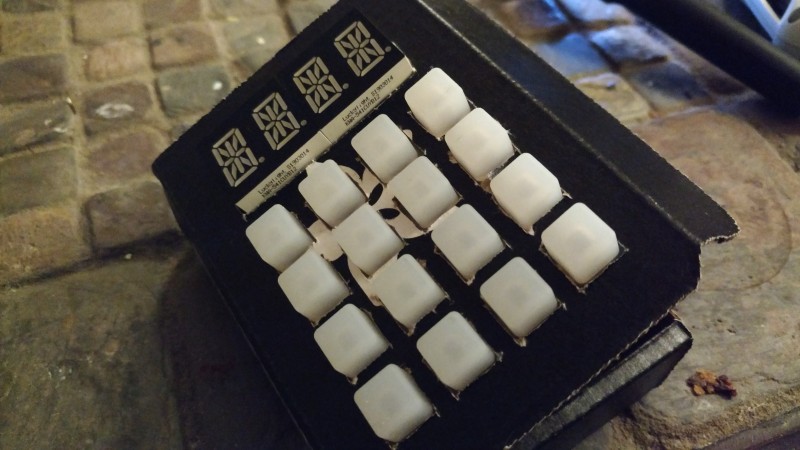
With the pad prototyped and programmed, we can now add some visual “polish”.
I think many people would 3D print a case, but cardboard works great as well.
To install the components, you can trace their outline and then cut out the matching hole.
The 14-segment display is the easiest - just trace around on the back of the cardboard, and cut the window out with an xacto-knife.
Similarly, trace the button pad and cut out holes for each of the buttons.
It may hold together better if you cut a hole for each button, rather than a larger hole for the entire pad.
Once, they’re in place, hot glue the display and button pad into place.
The pushbuttons usually have a nut to keep them in place.
You can use the interior of this nut to trace the hole for the button.
Cut out the hole, thread the button through, and secure into place with the nut.
I always want to always re-use components so instead of soldering the components directly into the perma-protoboard, I solder in headers and plug in the components later.
This is also useful, as to fit all the parts, I had to install components on both sides of the perma-protoboard.
When wiring the power to the Trellis, I found that the V_usb pin works better when plugged into usb (delivering 5V).
But when running from 2xAA batteries (2 x 1.7V = 3.4V) the V_usb doesn’t put out a consistent 5V.
As a result, it’s better to plug in the Trellis to the V_batt pin and let it run off of the 3.4V.
However, V_batt doesn’t drive the Trellis well when on USB.
Conclusion
With a straightforward circuit diagram (ground, power, SDA, SCL, and 2x digital button pins) this project was quick to prototype.
You may have some difficultly getting everything to fit in a box though!
With the assembly done, you can really let your programming go wild though.
I demonstrated a few simple modes here, but some other neat modes would be:
